Net::LDAP for Ruby is also written as net::ldap. It stands for Lightweight Directory Access Protocol. It is an internet standard protocol used to access directory servers. Its basic search unit is the entity, which corresponds to a person or other domain-specific object. A directory which supports LDAP protocol, typically stores information about a number of entities.
Ruby LDAP Principals
The LDAP servers are generally used to access information about people, but sometimes it is also used for items such as computers, printers and other resources.
Ruby LDAP Distinguished Names
In LDAP servers, an entity is uniquely identified by a globally-unique text string called as Distinguished name. It is like a DNS hostname, a DN is a “flattened” text representation of a string of tree nodes.
You can query an LDAP-enabled directory for information about the entity if you know the DN of a person or other entity. Otherwise, you can also see the list of DNs matching a set of criteria that you supply.
Ruby LDAP Attributes
In LDAP, information about the entity is stored as a set of Attributes. An attribute is a text string which is associated with zero or more values. Most LDAP-enabled directories contain a well standardized range of attributes and constrain their values according to standard values.
An example for attribute is sn. It stands for “surname”. This attribute is generally used to store a person’s surname. Most of the directories follow standard convention that an entity sn attribute will have exactly one value.
Ruby LDAP Tree-Base
Just like DNS, LDAP assumes that each directory server contains authoritative attribute data for a set of DNs corresponding to a specific sub-tree of global directory tree. This subtree is configured into directory server when it is created. You can’t query in most of the servers as they will not allow, unless you specify a correct tree-base.
Ruby LDAP Versions
Ruby LDAP veraions are stub, discuss v2 and v3.
Ruby LDAP Operations
Ruby LDAP operations are:
- #bind : The #bind operation provides a user’s authentication credentials to a server. They can provide different credentials for authentication but most of the directories ask for username and password only.
- #add : The #add operation specifies a new DN and an innitial set of attribute values. On the success of operation, a new entity with the corresponding DN and attributes is added to directory.
- #delete : The #delete operation specifies an entity DN. On the success of operation, the entity and all its attributes is removed from directory.
- #rename : The #rename operation is also called #modify_rdn. In earlier LDAP versions the only way to change DN of an entity was to delete the whole entity and add it again with a different DN. But with the introduction of #rename operation in version 3, you can change the DN without discarding its attribute values.
- #search : The #search operation is called to identify a directory by specifying a treebase, search filters and list of attribute values. Multiple filters can be joined together with NOT, AND and OR operators.
- #modify : The #modify operation specifies an entity DN and a list of attribute operations. It is used to change the attribute values stored in directory for a particular entity. It may add or delete attributes or change attributes by adding or deleting from their values. There are three methods to modify attribute values: #add_attribute, #delete_attribute and #replace_attreibute.
Installing Net::LDAP
The net::LDAP is a pure Ruby library. It does not require any external library. RubyGems version of Net::LDAP can be installed from usual sources.
Requirements
The Net::LDAP requires Ruby 2.0.0 interpreter or better.
To install RubyGems version of Net::LDAP, write the following command:
gem install net-ldap
Using Ruby net::LDAP
The Net::LDAP functionality start by requiring the library.
require 'net/ldap'
If you have installed Gem version, then you need following library.
require 'rubygems'
Credentials for LDAP connection
The Net::LDAP connection is a two step process.
Step 1 : Instantiating Net:LDAP object
Most of the Net:LDAP operations start by instantiating Net:LDAP object. The constructor takes arguments specifying address and port of LDAP server.
Syntax:
LDAP::Conn.new(host='localhost', port=LDAP_PORT)
Step 1 : Authentication (binding)
Here we need to specify username and password which we will use for the rest of the session.
Syntax:
- conn.bind(dn=nil, password=nil, method=LDAP::LDAP_AUTH_SIMPLE)do
- ....
- end
Now we can perform different operations like search, modify or delete inside block of bind method with proper permissions.
Adding a new LDAP entry
The following method adds a new entry to remote LDAP server.
add(args) => object
Step 1: Creating LDAP::Mod object
The LDAP::Mod object need to be passed to conn.add method to create an entry.
Syntax:
Mod.new(mod_type, attr, vals)
mod_type : You can add one or more option here like LDAP_MOD_ADD, LDAP_MOD_DELETE, LDAP_MOD_REPLACE.


attr : It is the name of the attribute.


vals : It is an array of values.


Step 2: Calling conn.add Method


After creating LDAP::Mod object, we need to call conn.add method
Syntax:
conn.add(dn, attrs)
Example:
#/usr/bin/ruby -w


require 'rubygems'

require 'net/ldap'


$HOST =    'localhost'

$PORT =    LDAP::LDAP_PORT

$SSLPORT = LDAP::LDAPS_PORT


conn = LDAP::Conn.new($HOST, $PORT)

conn.bind('cn=root, dc=localhost, dc=localdomain','secret')


conn.perror("bind")

entry1 = [

  LDAP.mod(LDAP::LDAP_MOD_REPLACE, 'sn', ['Steele']),

]


begin

  conn.modify("cn=Anna williams, dc=localhost, dc=localdomain", entry1)

rescue LDAP::ResultError

  conn.perror("modify")

  exit

end

conn.perror("modify")

conn.unbind
The above example will modify the surname in the previous example.
Deleting an LDAP entry
The delete method will delete an entry.
Syntax:
conn.delete(dn)
#/usr/bin/ruby -w


require 'rubygems'

require 'net/ldap'


$HOST =   'localhost'

$PORT =   LDAP::LDAP_PORT

$SSLPORT = LDAP::LDAPS_PORT


conn = LDAP::Conn.new($HOST, $PORT)

conn.bind('cn=root, dc=localhost, dc=localdomain','secret')


conn.perror("bind")

begin

  conn.delete("cn=Anna Steele, dc=localhost, dc=localdomain")

rescue LDAP::ResultError

  conn.perror("delete")

  exit

end

conn.perror("delete")

conn.unbind
Search in LDAP
There are three different modes to perform search with search method.
- LDAP_SCORE_BASEM : It will search only the base mode.
- LDAP_SCOPE_ONLEVEL : It will search all children of the base mode.
- LDAP_SCOPE_SUBTREE : It will search whole subtree including the base node.
Example:
#/usr/bin/ruby -w
require 'rubygems'
require 'net/ldap'
$HOST = 'localhost'
$PORT = LDAP::LDAP_PORT
$SSLPORT = LDAP::LDAPS_PORT
base = 'dc=localhost,dc=localdomain'
scope = LDAP::LDAP_SCOPE_SUBTREE
filter = '(objectclass=java)'
attrs = ['sn', 'cn']
conn = LDAP::Conn.new($HOST, $PORT)
conn.bind('cn=root, dc=localhost, dc=localdomain','secret')
conn.perror("bind")
begin
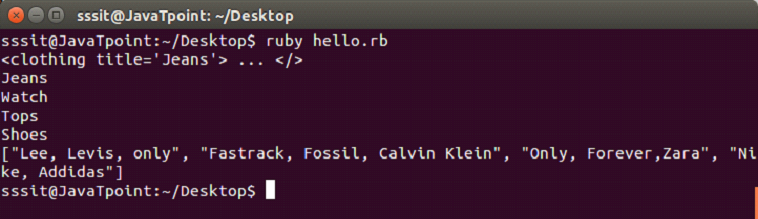
conn.search(base, scope, filter, attrs) { |entry|
# print distinguished name
p entry.dn
# print all attribute names
p entry.attrs
# print values of attribute 'sn'
p entry.vals('sn')
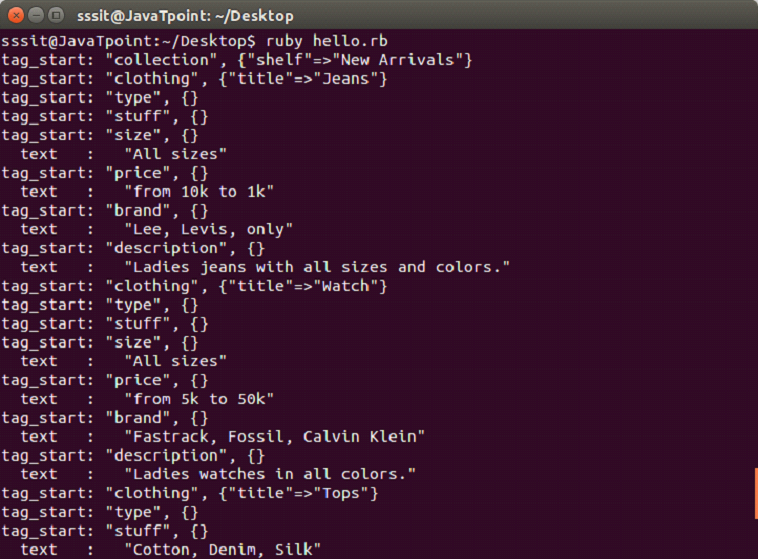
# print entry as Hash
p entry.to_hash
}
rescue LDAP::ResultError
conn.perror("search")
exit
end
conn.perror("search")
conn.unbind
In this example, we will search the whole subtree of entry.
In the last parameter of search, you can specify any attributes. If nil is passed, all attributes are returned same as “SELECT∗” in relational database.