Ruby XPath is a language to find information in an XML file. It is an alternative to view XML file. It is used to navigate through elements and attributes in an XML document, treating that document as a logical ordered tree.
Ruby XPath is very useful to get relevant information and attributes from XML file. It takes tree-based parsing.
Ruby XSLT is a simple class based on libxml and libxslt. There are two XSLT parsers available for Ruby.
Ruby-Sablotron
XSLT4R
It is freely distributable according to the terms of GNU. This program is distributed without any warranty.
Ruby-Sablotron
It is mainly written for Linux operating system and is written by Masayoshi Takahashi.
It requires the following libraries:
Sablot
Iconv
Expat
XSLT4R
It is written by Michael Neumann. It uses a simple command line interface and it can be alternatively used within a third-party application to transform an XML document.
XSLT4R needs XMLScan to operate, which is included within the XSLT4R archieve. These modules need to be installed using standard Ruby installation method.
XML is eXtensible Markup Language like HTML. It allows programmers to develop applications that can be read by other applications irrespective of operating system and developmental language used.
It keeps track of small to medium amounts of data without any SQL based technique in backend.
REXML is a pure Ruby XML processor. It represents a full XML document including PIs, doctype, etc. An XML document has a single child that can be accessed by root(). If you want to have an XML declaration for a created document, you must add one. REXML documents do not write a default declaration for you.
REXML was inspired by Electric XML library for Java. Its API is easy to use, small size and have followed the Ruby methodology for method naming and code flow.
It supports both tree and stream document parsing. Steam parsing is 1.5 times faster than tree parsing. However, in stream parsing you don’t get access to some features like XPath.
REXML features:
It is written 100 percent in Ruby.
It contains less than 2000 lines of code, hence, lighter in weight.
Its methods and classes are easy to understand.
It is shipped with Ruby installation. No need to install it separately.
It is used for both DOM and SAX parsing.
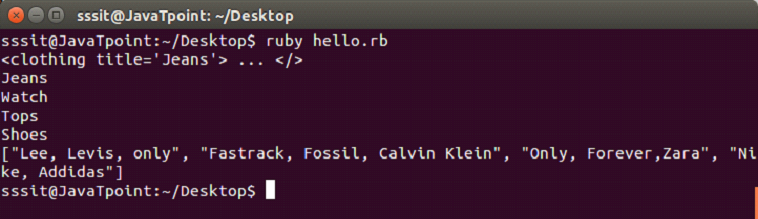
Parsing XML and accessing elements
Let’s start with parsing an XML document:
require "rexml/document"


file = File.new( "trial.xml" )


doc = REXML::Document.new file
In the above code, line 3 parses the supplied file.
In the above code, the require statement loads the REXML library. Then include REXML indicates that we don’t have to use names like REXML::Document. We have created trial.xml file. Document is shown on the screen.
Output:
The Document.new method takes IO, String object or Document as its argument. This argument specifies the source from which XML document has to be read.
If a Document constructor takes a Document as argument, all its element nodes are cloned to new Document object. If the constructor takes a String argument, string will be expected to contain an XML document.
XML with “Here Document”
A here Document is a way to specify a text block, preserving line breaks, whitespaces or identation with text.
A here Document is constructed using a command followed by “<<” followed by a token string.
In Ruby, there should be no space between “<<” and token string.
Example:
#!/usr/bin/env ruby


require 'rexml/document'

include REXML


info = <<XML

<info>

 <name>Caroline</name>

 <street>9820 St.</street>

 <city>Seattle</city>

 <contact>9854126575</contact>

 <country>USA</country>

</info>

XML


document = Document.new( info )

puts document
Here, we use here Document info. All the characters including newlines between <<EOF and EOF are part of info.
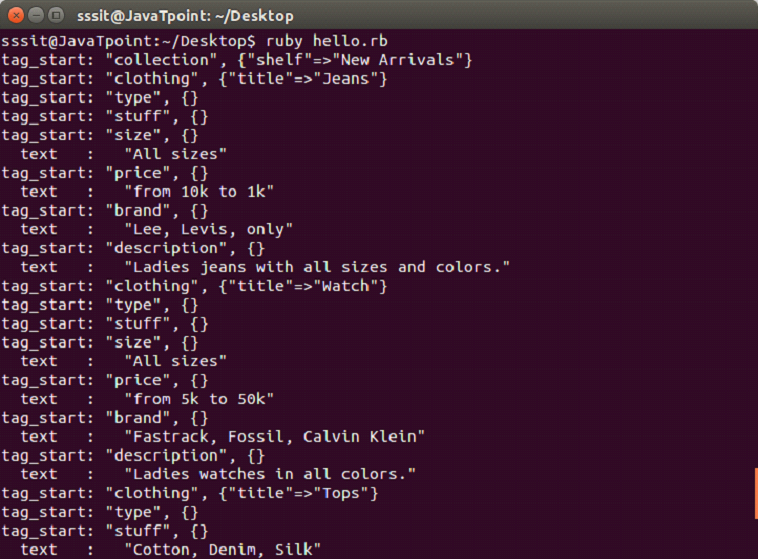
For XML parsing examples, we will use following XML file code as input:
We will parse our XML data in stream fashion. The above file trial.xml code is taken as input. Here, we will define a listener class whose methods will be targeted for callbacks from the parser.
It is advisable that do not use SAX-like parsing for a small file.
#!/usr/bin/ruby -w


require 'rexml/document'

require 'rexml/streamlistener'

include REXML


class MyListener

  include REXML::StreamListener

  def tag_start(*args)

    puts "tag_start: #{args.map {|x| x.inspect}.join(', ')}"

  end


  def text(data)

    return if data =~ /^\w*$/     # whitespace only

    abbrev = data[0..40] + (data.length > 40 ? "..." : "")

    puts "  text   :   #{abbrev.inspect}"

  end

end


list = MyListener.new

xmlfile = File.new("trial.xml")

Document.parse_stream(xmlfile, list)
Net::LDAP for Ruby is also written as net::ldap. It stands for Lightweight Directory Access Protocol. It is an internet standard protocol used to access directory servers. Its basic search unit is the entity, which corresponds to a person or other domain-specific object. A directory which supports LDAP protocol, typically stores information about a number of entities.
Ruby LDAP Principals
The LDAP servers are generally used to access information about people, but sometimes it is also used for items such as computers, printers and other resources.
Ruby LDAP Distinguished Names
In LDAP servers, an entity is uniquely identified by a globally-unique text string called as Distinguished name. It is like a DNS hostname, a DN is a “flattened” text representation of a string of tree nodes.
You can query an LDAP-enabled directory for information about the entity if you know the DN of a person or other entity. Otherwise, you can also see the list of DNs matching a set of criteria that you supply.
Ruby LDAP Attributes
In LDAP, information about the entity is stored as a set of Attributes. An attribute is a text string which is associated with zero or more values. Most LDAP-enabled directories contain a well standardized range of attributes and constrain their values according to standard values.
An example for attribute is sn. It stands for “surname”. This attribute is generally used to store a person’s surname. Most of the directories follow standard convention that an entity sn attribute will have exactly one value.
Ruby LDAP Tree-Base
Just like DNS, LDAP assumes that each directory server contains authoritative attribute data for a set of DNs corresponding to a specific sub-tree of global directory tree. This subtree is configured into directory server when it is created. You can’t query in most of the servers as they will not allow, unless you specify a correct tree-base.
Ruby LDAP Versions
Ruby LDAP veraions are stub, discuss v2 and v3.
Ruby LDAP Operations
Ruby LDAP operations are:
#bind : The #bind operation provides a user’s authentication credentials to a server. They can provide different credentials for authentication but most of the directories ask for username and password only.
#add : The #add operation specifies a new DN and an innitial set of attribute values. On the success of operation, a new entity with the corresponding DN and attributes is added to directory.
#delete : The #delete operation specifies an entity DN. On the success of operation, the entity and all its attributes is removed from directory.
#rename : The #rename operation is also called #modify_rdn. In earlier LDAP versions the only way to change DN of an entity was to delete the whole entity and add it again with a different DN. But with the introduction of #rename operation in version 3, you can change the DN without discarding its attribute values.
#search : The #search operation is called to identify a directory by specifying a treebase, search filters and list of attribute values. Multiple filters can be joined together with NOT, AND and OR operators.
#modify : The #modify operation specifies an entity DN and a list of attribute operations. It is used to change the attribute values stored in directory for a particular entity. It may add or delete attributes or change attributes by adding or deleting from their values. There are three methods to modify attribute values: #add_attribute, #delete_attribute and #replace_attreibute.
Installing Net::LDAP
The net::LDAP is a pure Ruby library. It does not require any external library. RubyGems version of Net::LDAP can be installed from usual sources.
Requirements
The Net::LDAP requires Ruby 2.0.0 interpreter or better.
To install RubyGems version of Net::LDAP, write the following command:
gem install net-ldap
Using Ruby net::LDAP
The Net::LDAP functionality start by requiring the library.
require 'net/ldap'
If you have installed Gem version, then you need following library.
require 'rubygems'
Credentials for LDAP connection
The Net::LDAP connection is a two step process.
Step 1 : Instantiating Net:LDAP object
Most of the Net:LDAP operations start by instantiating Net:LDAP object. The constructor takes arguments specifying address and port of LDAP server.
Syntax:
LDAP::Conn.new(host='localhost', port=LDAP_PORT)
Step 1 : Authentication (binding)
Here we need to specify username and password which we will use for the rest of the session.
There are three different modes to perform search with search method.
LDAP_SCORE_BASEM : It will search only the base mode.
LDAP_SCOPE_ONLEVEL : It will search all children of the base mode.
LDAP_SCOPE_SUBTREE : It will search whole subtree including the base node.
Example:
#/usr/bin/ruby -w


require 'rubygems'

require 'net/ldap'


$HOST =    'localhost'

$PORT =    LDAP::LDAP_PORT

$SSLPORT = LDAP::LDAPS_PORT


base = 'dc=localhost,dc=localdomain'

scope = LDAP::LDAP_SCOPE_SUBTREE

filter = '(objectclass=java)'

attrs = ['sn', 'cn']


conn = LDAP::Conn.new($HOST, $PORT)

conn.bind('cn=root, dc=localhost, dc=localdomain','secret')


conn.perror("bind")

begin

  conn.search(base, scope, filter, attrs) { |entry|

     # print distinguished name

     p entry.dn

     # print all attribute names

     p entry.attrs

     # print values of attribute 'sn'

     p entry.vals('sn')

     # print entry as Hash

     p entry.to_hash

  }

rescue LDAP::ResultError

  conn.perror("search")

  exit

end

conn.perror("search")

conn.unbind
In this example, we will search the whole subtree of entry.
In the last parameter of search, you can specify any attributes. If nil is passed, all attributes are returned same as “SELECT∗” in relational database.
Thread means lightweight sub-process. It is a separate path of execution. In Ruby, different parts of a program can run at the same time by either splitting tasks within a program using multiple threading or splitting tasks between different programs using multiple process.
Threads are the Ruby implementation for a concurrent programming model.
Ruby Multithreading
A normal program has single thread of execution. All the statements in the program are executed sequentially.
A multi thread program has more than one thread of execution in it. It uses less memory space and share same address space. Multithreading is used to perform more than one task at once.
A new thread is created using thread.new call. It is different from the main thread’s execution.
Thread Initialization
To create a new thread Ruby provides three keywords namely, ::new, ::start and ::fork.
To start a new thread, associate a block of code with a call to Thread.new, Thread.start or Thread.fork. Thread will be created. The new thread exits when the block exit.
Syntax:
# Original thread runs

Thread.new {

  # New thread is created.

}

# Original thread runs
Thread Termination
There are different ways to terminate a thread in Ruby. To exit a given thread, class ::kill is used.
Syntax:
thr = Thread.new { ... }


Thread.kill(thr)
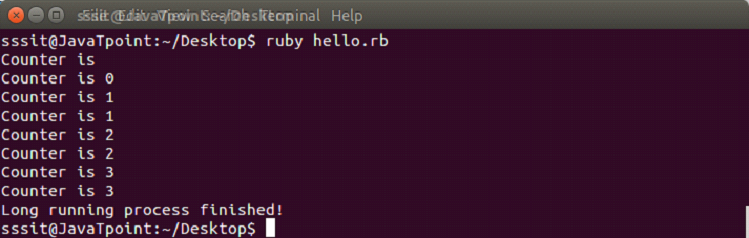
Ruby Thread Example
#!/usr/bin/ruby

th = Thread.new do #Here we start a new thread

  Thread.current['counter']=0

  5.times do |i| #loop starts and increases i each time

    Thread.current['counter']=i

    sleep 1

  end

  return nil

end

while th['counter'].to_i < 4  do

=begin

th is the long running thread

and we can access the same variable

from inside the thread here

=end

  puts "Counter is #{th['counter']}"

  sleep 0.5

end

puts "Long running process finished!"
Output:
Thread Lifecycle
Once a thread is created, there is no need to start it. It automatically runs when it gets proper CPU resources. The last expression in a block is the value of the thread. If thread has run completely, value method returns the thread value, otherwise value method blocks it and returns when the thread has completed. A number of methods are defined by thread class while running query and manipulate the thread.
By calling a thread’s Thread.join method, you can wait for a particular thread to finish.
Thread Exception Handling
Threads may have some exceptions in them. If exception arises in any thread other than main thread, it depends upon abort_on_exception. By default this option is always false. It means unhandled exception will silently terminate the thread. This can be changed by setting either abort_on_exception = true or $DEBUG to true.
To handle exception, you can use class method ::handle_interrupt. It will handle exceptions asynchronously with threads.
Thread Variables and Scope
Threads are created with blocks. A local variable created within a block is accessible to only thread in which this block is present.
Ruby thread class allows thread-local variables to be created and accessed by name. Thread object is treated like a hash, writing elements using []= and reading them back using [].
Thread Scheduling
Ruby supports scheduling threads by using ::stop and ::pass methods in a program.
The ::stop class method put the current running thread to sleep and schedule the execution of another thread. Once the thread is asleep, instance method wakeup is used to mark thread as eligible for scheduling.
The ::pass class method tries to pass execution to another thread. It depends upon the operating system whether the running thread will switch or not.
Thread priority gives a hint to schedule threads according to their priority. The high priority thread is scheduled first. It also depends upon the operating system. A thread can increase or decrease its own priority as the first action it takes.
Thread Exclusion
Ruby thread exclusion states that, when two threads share the same data and one of the thread modifies that data, then we need to ensure that no thread should see each others data in an inconsistent state. For example, banking server. Where one thread operates money transfer in accounts and other thread is generating monthly report for the customers.
Public Class Methods
Method
Description
abort_on_exception
It returns the status of global “abort on exception” condition. The default is true. When it is set to true, all threads will abort if an exception is raised in any thread.
abort_on_exception=
When it is set to true, all threads will abort if an exception is raised. It returns the new state.
current
It returns the currently executing thread.
exclusive{block}
It wraps the block in a single, returning the value of the block.
exit
It terminates the currently running thread and schedules another thread tro run.
kill(thread)
It causes the given thread to exit.
fork([args]*){|args| block}
It is basically same as ::new method.
handle_interrupt(hash){…}
Changes asynchronous interrupt timing.
list
Returns an array of thread objects for all threads that are either runnable or stopped.
main
Returns the main thread.
new{…}/ new(*args, &proc)/ new(*args){|args|…}
It creates a new thread executing the given block.
pass
It gives the thread scheduler a hint to pass execution to another thread. A running thread may or may not switch depending upon the OS.
pending_interrupt?(error = nil)
It returns whether or not the asynchronous queue is empty.
start([args]*){|args|block}
It is basically same as ::new method.
stop
It stops execution of the current thread, putting it into ‘sleep’ state and schedules execution of another thread.
Public Instance Methods
Method
Description
thr[sym]
It returns the value of a fiber-local variable using either a string or symbol name.
thr[sym]=
It creates the value of a fiber-local variable using either a string or symbol name.
abort_on_exception
It returns status of “abort on exception” for thr.
abort_on_exception=
When set to true, all threads will abort if an exception is raised in this thr.
add_trace_func(proc)
Adds proc as a handler for tracing.
alive?
It returns true if thr is running or sleeping.
backtrace
It returns current backtrace of target ahead.
backtrace_locations(*args)
It returns the execution stack for the target ahead.
exit/kill/terminate
It terminates thr and executes another thread to run.
group
It returns the ThreadGroup which contains the given thread or returns nil.
inspect
It dumps the name, id and status of thr to a string.
join
The calling thread will suspend execution and run this thr.
key?(sym)
It returns true if the given string exists as a fiber-local variable.
keys
It returns an array of the name of the fiber-local variables.
pending_interrupt?(error=nil)
Returns whether or not the asynchronous queue is empty for the target thread.
priority
It returns the priority of thr.
priority=
It sets the priority of thr to integer.
kill
It works same as exit.
raise
It raises an exception from the given thread.
run
It wakes up thr, making it eligible for scheduling.
safe_level
It returns the safe level in effect for thr.
set_trace_func(proc)
It establishes proc on thr as the handler.
status
It returns the status of thr.
stop?
It returns true if thr is sleeping or dead.
terminate
It terminates thr and schedules another thread to run.
thread_variable?(key)
It returns true if the given string exists as a thread local variable.
thread_variable_get(key)
It returns the value of a thread local variable that has been set.
thread_variable_set(key, value)
Set a thread local with key to value.
thread_variable
It returns an array of the thread-local variables.
value
It waits for thr to complete, using join and returns its value.
wakeup
Makes a given thread eligible for scheduling, although it may still remained block on I/O.
Sockets are the end points of a network communication channel, where client and server communicate to each other. They can communicate either on same machine or on different machines.
Types of socket:
TCP Socket
UDP Socket
UNIX Socket
There are two levels of socket, high and low. Low level access allows you to work on sockets that are supported by your system. It allows the implementation of both connectionless and connection oriented protocols. High level access allows you to work on network protocols like HTTP and FTP.
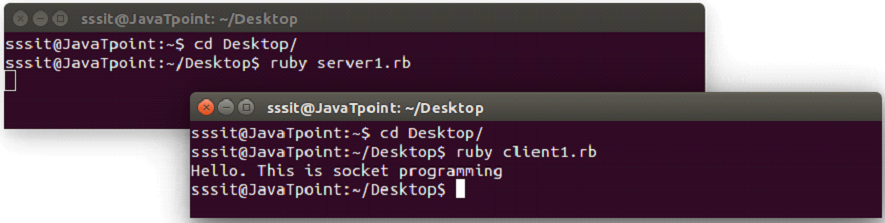
Example1
server1.rb
#!/usr/bin/ruby

require 'socket'


server = TCPServer.open(2017)

loop {

    client = server.accept

    client.puts "Hello. This is socket programming"

    client.close

}
In the above code, the pre installed socket module need to be included. We are using 2017 port on our system. You can use any port.
Start a loop, accept all connections made to port 2017 and send data to the client over socket networking.
Lastly, close the socket.
client1.rb
#!/usr/bin/ruby

require 'socket'


hostname = 'localhost'

port = 2017


s = TCPSocket.open(hostname, port)


while line = s.gets

    puts line.chomp

end

s.close
In the above code, the pre installed socket module need to be included. Create a socket and connect it to port 2017.
create a while loop to fetch all information sent over the socket.
Lastly, close the socket.
Output:
Go to the terminal, change to the directory to which you have saved the above two files. We have saved it in our Desktop directory.
Now to execute these files, we need to have the required permission. Run the following command in the terminal,
chmod a+x *.rb
This command will make all the Ruby files executable present in this directory.
Now open two terminals. In the first terminal execute server script and in the second terminal execute client script with the following command.
ruby filename.rb
Multiple clients socket programming
For multiple clients overs a socket programming, a loop and some threads will be needed to accept and respond to multiple clients.
Example2
server3.rb
#!/usr/bin/env ruby -w

require "socket"

class Server

  def initialize( port, ip )

    @server = TCPServer.open( ip, port )

    @connections = Hash.new

    @rooms = Hash.new

    @clients = Hash.new

    @connections[:server] = @server

    @connections[:rooms] = @rooms

    @connections[:clients] = @clients

    run

  end


  def run

    loop {

      Thread.start(@server.accept) do | client |

        nick_name = client.gets.chomp.to_sym

        @connections[:clients].each do |other_name, other_client|

          if nick_name == other_name || client == other_client

            client.puts "This username already exist"

            Thread.kill self

          end

        end

        puts "#{nick_name} #{client}"

        @connections[:clients][nick_name] = client

        client.puts "Connection established..."

        listen_user_messages( nick_name, client )

      end

    }.join

  end


  def listen_user_messages( username, client )

    loop {

      msg = client.gets.chomp

      @connections[:clients].each do |other_name, other_client|

        unless other_name == username

          other_client.puts "#{username.to_s}: #{msg}"

        end

      end

    }

  end

end


Server.new( 2019, "localhost" )
In the above code, server will have the same port as client side to establish connection. Here we need one thread per connected user to handle all the possible users.
The run method verify whether an entered name is unique or not. If username already exists, connection will be killed otherwise connection will be established.
The listen_user_messages method listen to the user messages and send them to all the users.
client3.rb
#!/usr/bin/env ruby -w

require "socket"

class Client

  def initialize( server )

    @server = server

    @request = nil

    @response = nil

    listen

    send

    @request.join

    @response.join

  end


  def listen

    @response = Thread.new do

      loop {

        msg = @server.gets.chomp

        puts "#{msg}"

      }

    end

  end


  def send

    puts "Enter your name:"

    @request = Thread.new do

      loop {

        msg = $stdin.gets.chomp

        @server.puts( msg )

      }

    end

  end

end


server = TCPSocket.open( "localhost", 2019 )

Client.new( server )
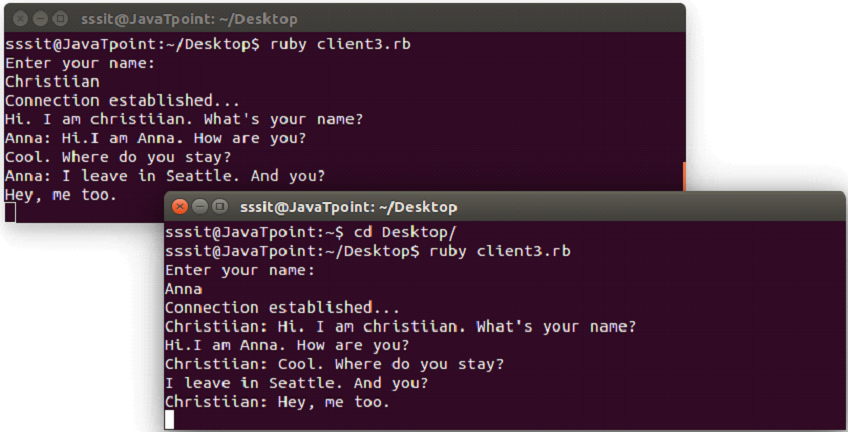
In the above code, class Client is created to handle users.
Two threads are created in send and listen methods so that we can read/write messages at the same time.
Output:
Below snapshot shows chatting between two clients.
A regular expression is also spelled as regexp which holds a regular expression, used to match a pattern against strings. In Ruby, a pattern is written between forward slash characters. They describe the content of a string. Ruby regular expression is more similar to Perl regular expression.
Syntax:
/search string/
Ruby 1.9 uses Oniguruma regular expressions library but Ruby 2.0 uses Onigmo regular expressions library. Onigmo is a fork library of Oniguruma adding some new features.
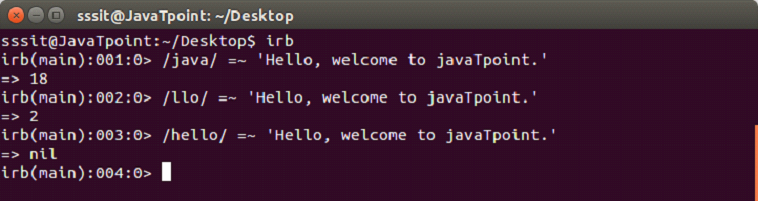
=∽ and #match operators
The pattern matching is achieved by using =∽ and #match operators.
=∽
This is the basic matching pattern. Here two operands are used. One is a regular expression and other is a string. The regular expression is matched with the string.
If a match is found, the operator returns index of first match otherwise nil.
Example:
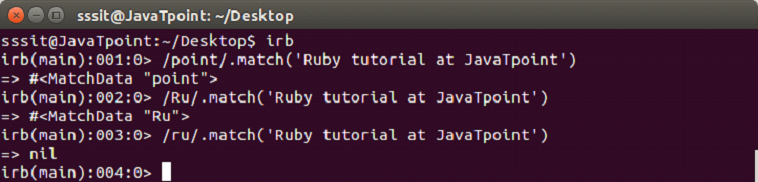
#match
This operator returns a MatchData object on matching otherwise nil.
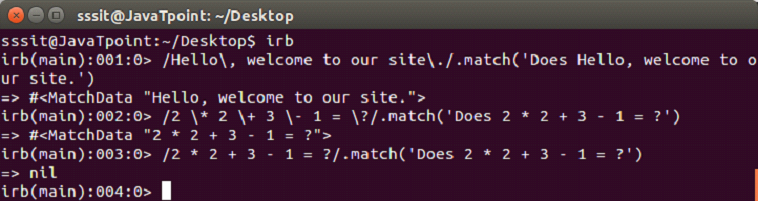
Metacharacters and Escapes
Metacharacters have specific meaning in a pattern. To match a string, they are back slashed (\\\) or escaped. Some meta characters are (,), (.), (?), (+), (-), (*), [,], {,}.
It returns the specific string when matched otherwise nil.
Example:
Characters Classes
Metacharacters have specific meaning in a pattern. To match a string, they are back slashed (\\\) or escaped.
A character class is encircled within square brackets.
[ab]
Here, [ab] means a or b. It is the oppoite of /ab/ which means a and b.
Example:
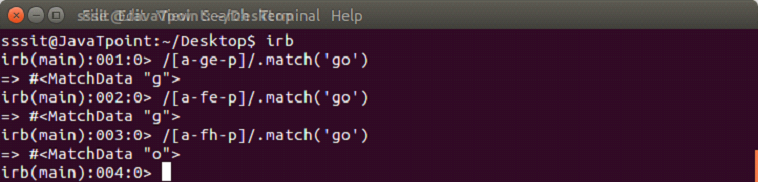
[a-d]
Here, [a-d] is equivalent to [abcd]. The hyphen (-) character class represents range of characters.
Example:
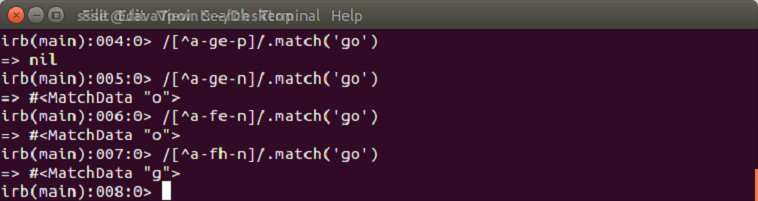
[^a-d]
The ^ sign represents any other character which is not present in the range.
Example:
Repetition
Characters defined till now match a single character. With the help of repetition metacharacter, we can specify how many times they need to occur. These meta characters are called quantifiers.
*: Zero or more times
+: One or more times
?: Zero or one times (optional)
{n}: Exactly n times
{n, }: n or more times
{,m}: m or less times
{n,m}: At least n and at most m times
Example:
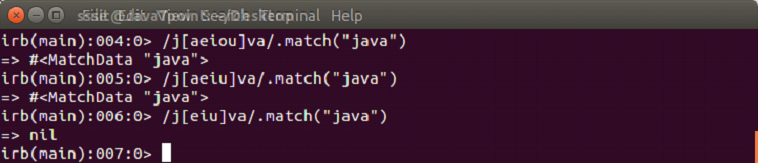
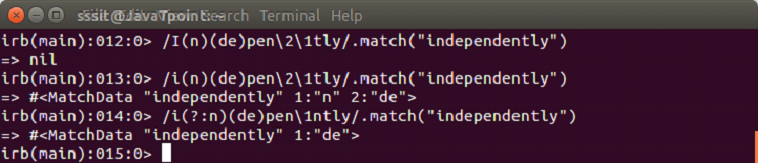
Grouping
Grouping uses parentheses to group the terms together. Grouping the terms together make them one.
Example:
In this example, first pattern matches a vowel followed by two characters.
In the second pattern, it matches a vowel followed by a word character, twice.
(?:..)
This expression provides grouping without capturing. It combines term without creating a backreference.
Ruby is a true object oriented language which can be embedded into Hypertext Markup Language. Everything in Ruby is an object. All the numbers, strings or even class is an object. The whole Ruby language is basically built on the concepts of object and data.
OOPs is a programming concept that uses objects and their interactions to design applications and computer programs.
Following are some basic concepts in OOPs:EncapsulationPolymorphismInheritanceAbstraction
Encapsulation: It hides the implementation details of a class from other objects due to which a class is unavailable to the rest of the code. Its main purpose is to protect data from data manipulation.
Polymorphism: It is the ability to represent an operator or function in different ways for different data input.
Inheritance: It creates new classes from pre defined classes. New class inherit behaviors of its parent class which is referred as superclass. In this way, pre defined classes can be made more reusable and useful.
Abstraction: It hides the complexity of a class by modelling classes appropriate to the problem.
Ruby Class
Ruby class defines blueprint of a data type. It defines what does that class name means.
A class is defined with a class keyword followed by the class name and is ended with end keyword.
Conventionally, class name must begin with a capital letter. Class name with more than one word run together with each word capitalized and no separating characters.
Creating Class
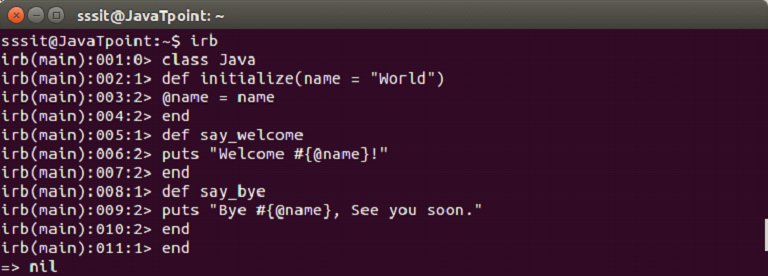
Example:
We will create a class Java with following command,
class Greeter Ruby Regular Expression
A new class Java is created. The @name is an instance variable available to all the methods of the Java class. It is used by say_welcome and say_bye.
Ruby Objects
In Ruby, everything is an object. When we create objects, they communicate together through methods. Hence, an object is a combination of data and methods.
To create an object, first, we define a class. Single class can be used to create many objects. Objects are declared using new keyword.
Creating Object
Example:
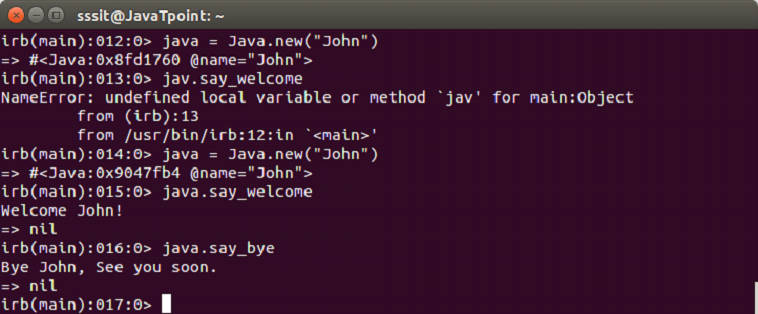
We have a class named Java. Now, let’s create an object java and use it with following command,
java = Java.new("John")
Once java object is created, it will use John as the name.
Ruby Methods
Methods are functions which are defined inside the body of a class. Data in Ruby is accessible only via methods. There is a follow path in which Ruby looks when a method is called. To find out the method lookup chain we can use ancestors method.
Defining Method
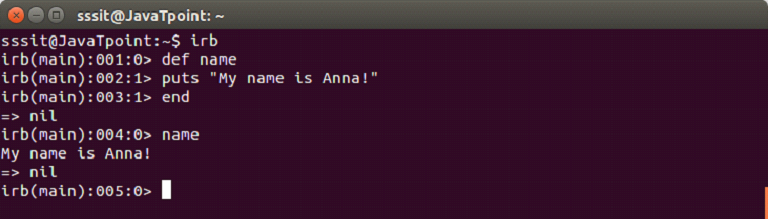
A method is defined with def keyword and ends with end keyword.
We are defining a method name which will display the following message.
The def keyword starts the definition of method name. Then we write body of the mehtod. Last line end indicates that method is defined.
Instance Methods
The instance methods are also defined with def keyword and they can be used using a class instance only.
Example:
#!/usr/bin/ruby -w


# define a class

class Circle

   # constructor method

   def initialize(r)

      @radius = r

   end

   # instance method

   def getArea

      3.14 * @radius * @radius

   end

end


# create an object

circle = Circle.new(2)


# call instance methods

a = circle.getArea()

puts "Area of the box is : #{a}"
Output:
Ruby Inheritance
In inheritance, we create new classes using pre defined classes. Newly created classes are called derived classes and classes from which they are derived are called base classes. With inheritance, a code can be reused again which reduces the complexity of a program.
Ruby does not support multiple levels of inheritance. Instead it supports mixins.
In Ruby, < character is used to create a subclass. The syntax is shown below:
parentClass < subClass
Example:
#!/usr/bin/ruby


class Parent


    def initialize

        puts "Parent class created"

    end

end


class Child < Parent


   def initialize

       super

       puts "Child class created"

   end

end


Parent.new

Child.new
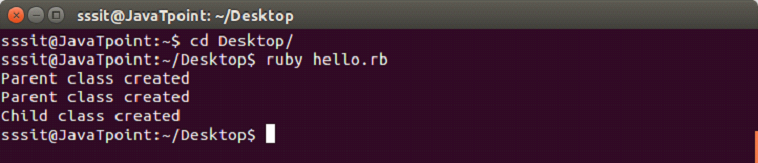
In the above example, two classes are created. One is base Parent class and other is derived Child class.
The super method calls the constructor of the Parent class.
From the last two line, we instantiate both the classes.
Output:
In the output, first the Parent class is created, derived Child class also calls the constructor of its parent class and then Child class is created.
Ruby Constructor
A constructor is automatically called when an object is created. They do not return any values. In Ruby, they are called initialize.
A constructor’s main purpose is to initiate the state of an object. They can’t be inherited. The parent object constructor is called with super method.
Example:
#!/usr/bin/ruby


class Parent


    def initialize

        puts "Parent is created"

    end


end


Parent.new
Ruby exception is an object, an instance of the class Exception or descendent of that class. It represents some exceptional condition.
In a Ruby program, when something goes wrong, it throws an exceptional behavior. By default Ruby program terminates on throwing an exception.
We can declare some exception handlers within Ruby. An exception handler is a block of code which is executed when exception occurs in some other block of code.
Exceptions are handled in two ways. Either you can terminate the program or deal with the exception. To deal with an exception, you can provide a rescue clause. By providing this, program control flows to the rescue clause.
When an exception is raised but not handled, global variable $! contains the current exception and $@ contains the current exception’s backtrace.
Ruby predefined classes like Exception and its children helps you to handle errors of your program. In Ruby exception hierarchy, most of the sub classes extend class StandardError. These are the normal exceptions.
Ruby Class Exceptions
Built-in subclasses of exception are as follows:
NoMemoryError
ScriptError
SecurityError
SignalException
StandardError
SystenExit
SystemStackError
fatal – impossible to rescue
Example:
def raise_exception

  puts 'I am before the raise.'

  raise 'oops! An error has occured'

  puts 'I am after the raise'

end

raise_exception
Output:
The raise method comes from the Kernel module.
Handling an Exception
To handle exception, the code that raises exception is enclosed within begin-end block. Using rescue clauses we can state type of exceptions we want to handle.
Example:
def raise_and_rescue

  begin

    puts 'Before the raise.'

    raise 'An error occured.'

    puts 'After the raise.'

  rescue

    puts 'Code rescued.'

  end

  puts 'After the begin block.'

end

raise_and_rescue
Output:
In the above example, interrupted code does not run completely. After exception handling code resumes after the begin-end block.
If no argument is defined in the rescue clause, the parameter defaults to StandardError. Each rescue clause specify multiple exceptions to catch. If raise is used without any parameters, exception may re-raised.
The rescue clauses are written in a begin/rescue block. Exceptions if not handled by one rescue clause will br handled with the next one.
  begin


code..


rescue OneTypeOfException


code..


rescue AnotherTypeOfException


 code..


else


  # Other exceptions


end
In the begin block, each rescue clause with the raised exception will be compared against each of parameters in turn. It will be matched when the type of error thrown and exception named in the rescue clause is either same or is a superclass of that exception. The else clause is executed if body of begin statement is completed without exceptions. If an exception occurs, else clause will not be executed.
Exception Object
Exception objects are normal objects. A rescued exception can be hold to a variable within the rescue clause.
Example:
begin

  raise 'an exception'

rescue ZeroDivisionError => e

  puts "Exception Class: #{ e.class.name }"

  puts "Exception Message: #{ e.message }"

  puts "Exception Backtrace: #{ e.backtrace }"

end
The Exception class defines two methods that return details about the exception. The message method returns a string that define the explanation of error. The backtrace method returns an array of string that represent the call stack at that point where exception was raised.
Using retry Statement
Usaually in a rescue clause, the exception is captured and code resumes after begin block. Using retry statement, the rescue block code can be resumed from begin after capturing an exception.
Syntax:
begin

   code....

rescue

    # capture exceptions

    retry  # program will run from the begin block

end
Example:
#!/usr/bin/ruby


begin

   x = Dir.mkdir "alreadyExist"

   if x

      puts "Directory created"

   end

rescue

   y = "newDir"

   retry

end
The above program runs as follows:
Step 1 In the begin block, code is written to make a directory that already exists.
Step 2 This will throw an error.
Step 3 In rescue block, y was reassigned.
Step 4 The retry statement will go to the begin block.
Step 5 Directory will be created.
Using raise Statement
The raise statement is used to raise an exception.
Syntax:
raise
Or,
raise ExceptionType, "Error Message"
Or,
raise ExceptionType, "Error Message"
Or,
raise ExceptionType, "Error Message" condition
The first one re-raises the current exception. It is used for exception handlers where exception is intercepted before passing it on.
The second one creates a new RuntimeError exception. This exception is then raised up the call stack.
The third one uses first argument to create an exception, then sets associated message to the second argument.
The fourth one similar to third one. In this you can add any conditional statement to raise an exception.
Example:
#!/usr/bin/ruby


begin


    puts 'code before raise.'


    raise 'exception occurred.'


    puts 'code after raise.'


rescue


    puts 'I am rescued.'


end


puts 'code after begin block.'
Output:
Using ensure Statement
There is an ensure clause which guarantees some processing at the end of code. The ensure block always run whether an exception is raised or not. It is placed after last rescue clause and will always executed as the block terminates.
The ensure block will run at any case whether an exception arises, exception is rescued or code is terminated by uncaught exception.
Syntax:
begin

  code..

   #..raise exception

rescue

   #.. exception is rescued

ensure

   #.. This code will always execute.

end
Example:
begin

  raise 'Exception'

rescue Exception => e

  puts e.message

  puts e.backtrace.inspect

ensure

  puts "The ensure code will always run"

end
Output:
Using else Statement
The else clause is always present after rescue clause and before ensure clause. If no exceptions are raised, then only else block is executed.
Syntax:
begin

   code..

   #..raise exception

rescue

   # .. exception is rescued

else

   #.. executes if there is no exception

ensure

   #..  This code will always execute.

end
Example:
begin


 # raise 'A test exception.'


 puts "no exception is raised"


rescue Exception => e


  puts e.message


  puts e.backtrace.inspect


else


   puts "else code will be executed as no exception is raised."


ensure


  puts "ensure code will run"


end
Output:
Ruby Catch and Throw
Ruby catch and throw provide a way to jump from the execution early when no further work is needed in a code.
The catch defines a block that is labeled with a given name. It is used to jump out of nested code. Using catch, the block will be executed normally until throw is encountered.
The catch and throw method is faster than rescue and raise clauses. Hence, it is more suitable to use.
Syntax:
throw :lablename

#.. this  code will not be executed

catch :lablename do

#.. matching catch will be executed after a throw is encountered.

end
Or,
throw :lablename condition

#.. this code will not be executed

catch :lablename do

#.. matching catch will be executed after a throw is encountered.

end
Ruby I/O is a way to interact with your system. Data is sent in the form of bytes/characters. IO class is the basis for all input and output in Ruby. It may be duplexed, hence may use more than one native operating system stream.
IO has a subclass as File class which allows reading and writing files in Ruby. The two classes are closely associated. IO object represent readable/writable interactions to keyboards and screens.
Common modes in I/O port
“r”: read-only mode is the default mode starts at beginning of file.
“r+”: read-write mode, starts at beginning of file.
“w”: write-only mode, either creates a new file or truncates an existing file for writing.
“w+”: read-write mode, either creates a new file or truncates an existing file for reading and writing.
“a”: write-only mode, if file exists it will append the file othrwise a new file will be created for writing only.
“a+”: read and write mode, if file exists it will append the file othrwise a new file will be created for writing and reading.
IO Console
The IO console provides different methods to interact with console. The class IO provides following basic methods:
IO::console
IO#raw#raw!
IO#cooked
IO#cooked!
IO#getch
IO#echo=
IO#echo?
IO#noecho
IO#winsize
IO#winsize=
IO#iflush
IO#ioflush
IO#oflush
Ruby opening a file
A Ruby file can be created using different methods for reading, writing or both.
There are two methods to open a file in Ruby:
File.new method : Using this method a new file can be created for reading, writing or both.
File.open method : Using this method a new file object is created. That file object is assigned to a file.
Difference between both the methods is that File.open method can be associated with a block while File.new method can’t.
Syntax:
f = File.new("fileName.rb")
Or,
File.open("fileName.rb", "mode") do |f|
Example to create a file
Let’s create a file in Ruby using File.open method to read or write data from files.
Step 1) In file hello.rb, write the code to create a new file as shown below.
#!/usr/bin/ruby

File.open('about', 'w') do |f|

    f.puts "This is JavaTpoint"

    f.write "You are reading Ruby tutorial.\n"

    f << "Please visit our website.\n"

end
Step 2) Type the following two commands in the console to view the created file.
ruby hello.rb

cat about
The new file is created and content is displayed in the terminal as shown above.
Ruby reading a file
There are three different methods to read a file.
To return a single line, following syntax is used.
Syntax:
f.gets

 code...
To return the whole file after the current position, following syntax is used.
Syntax:
f.read
code…
To return file as an array of lines, following syntax is used.
Syntax:
f.readlines

 [code...]
Example to read a file
Let’s create a file in Ruby using File.open method to read or write data from files.
Step 1) In file hello.rb, write the code to read an already existing file as shown below.
#!/usr/bin/ruby
while line = gets
puts line
end
Step 2) Type the following command in the console to read the file.
ruby hello.rb about
Content of about file is displayed in the console.
The sysread Method
The sysread method is also used to read the content of a file. With the help of this method you can open a file in any mode.
Example:
In file hello.rb, write the code to read an already existing file as shown below.
#!/usr/bin/ruby


aFile = File.new("about.txt", "r")


if aFile


   content = aFile.sysread(40)


   puts content


else


   puts "Unable to open file!"


end
Output:
The argument 40 will print till 40 characters from the file.
Ruby writing a file
With the help of syswrite method, you can write content into a file. File needs to be opened in write mode for this method.
The new content will over ride the old content in an already existing file.
Example:
#!/usr/bin/ruby


aFile = File.new("about.txt", "r+")

if aFile

   aFile.syswrite("New content is written in this file.\n")

end
Output:
Ruby renaming and deleting a file
Ruby files are renamed using rename method and deleted using delete mehtod.