Category: Wordpress

  • Free vs Paid WordPress Theme

    As you already know there are two types of WordPress themes, one is paid (premium) and other one is free. Both are from WordPress community but they possess some differences in their functionality. For some users free themes may be suitable and for some users premium themes may be suitable. It all depends upon their need. A huge number of WordPress themes are available as free but still people go for premium themes. There are multiple reasons why one should go for paid one.

    Let’s have a look on some of the functions of free as well as premium themes. It will help you in choosing a theme for you.


    Cost

    Free themes of course as name suggests are absolutely free. You can use them any time without any money.

    For premium you have to pay. Its range starts from $1000 which varies depending upon the designing of theme. It is good when you are earning enough from your site but if you are using your site just as a hobby then it may cost you a lot.


    Quality

    If you want your site at a good rank then you need to improve its quality.

    Free theme will not make your site unique. Same theme will be used by other sites because it is free for everyone.

    To make your site unique go for the premium one. There are some other qualities which need to be fulfilled. Like your site has to be responsive and should support different browsers. Free theme is not guaranteed to provide these qualities.


    Support

    In free themes if you need any type of help, you have to search for help and ask on forums. If someone will be willing then you may get your answer but it will take some time.

    Premium themes designer offer some support system. You will get timely support from reliable developers. Your problem will be solved very quickly.


    Update

    WordPress is constantly updated in every few months, so your themes and plugins need to be compatible with the updated version.

    Free themes may not be updated regularly. If you are using a free theme and an updated version comes, then you have two options. Either don’t update your site or install a new them. Both the options are not right.

    Premium theme developers update it on a regular basis to make it compatible with the new WordPress version. So if you are using a premium theme, then it is the responsibility of company to update it. You don’t have to worry about it.


    SEO

    SEO plays an important role in the ranking of your website. It is important for your site to have an SEO options and clean code.

    In free themes there are many structural bugs and they don’t provide inbuilt SEO options.

    Premium themes provide better coding which helps to load your site faster.


    Features

    Theme developers have to offer latest features for their customers according to the trend.

    Free themes provide limited features. Their developers do not update their theme. They are more compatible to the plugins than premium themes.

    Premium theme developers provide latest features and much more functionality than free themes. They provide an easy user interface that allows users to make any type of changes in the design of their site.


    Encrypted Links

    In free themes there are some unwanted links in the footer area. These links are irrelevant from the content of your website. It seriously affects the SEO of your site.

    Free themes developers add some links at the footer of their themes which is very annoying.


    Security

    Security should be of a high level in order to prevent your site. wordPress provides a better security by updating it every few months. An out dated theme may cause a lot of security issues.

    Free themes generally have high security threat.

    On the other hand, premium themes give high security standards to their customers.

  • How to Install WordPress Themes

    For theme installation, first you need to select a theme either free or a premium one. There are a lot of sites from where you can download a theme. Theme will be downloaded in zip format. The next process is installation process. Installation has some steps to be followed.

    There are two methods from which you can install a theme:

    • Installing WordPress using admin theme search
    • Installing WordPress using upload method

    Installing WordPress using admin theme search

    To install free themes from WordPress.org directory, login into your account and click Appearance > Themes.

    Wordpress How to install wordpress themes1

    Look at the above snapshot, click on Themes option. Following page will appear in front of you.

    Wordpress How to install wordpress themes2

    Click on Add New button to Add New themes.

    Wordpress How to install wordpress themes3

    Look at the above snapshot, here you’ll see an option for Feature Filter.

    Wordpress How to install wordpress themes4

    Look at the above snapshot, here you can filter your search for themes by applying your choice for Layout, Features and Subject.

    Wordpress How to install wordpress themes5

    Look at the above snapshot, we have selected 4 filter criteria, now click on button Apply Filters 4 to apply the filters.

    Wordpress How to install wordpress themes6

    Look at the above snapshot, select a theme and take your mouse above it. Click on Install button.

    Wordpress How to install wordpress themes7

    Look at the above snapshot, our theme is installed. To activate it click on Activate button. And you have successfully activated your WordPress theme.


    Installing WordPress using upload method

    The above method was only to install free themes that are available in WordPress directory only. But if you want to install premium themes, then you have to choose this option which includes following steps. This method can be used to install premium as well as free themes.


    Downloading theme

    WordPress site itself has a large collection of themes. All the themes on the WordPress site is fully examined and tested. If you are not satisfied with these themes you can go to other sites to download a theme. Make sure you select trusted site to download a theme as anyone can create a theme for WordPress.

    Themes are downloaded in the zip format.

    Go to wordpress.org site.

    Wordpress How to install wordpress themes8

    Look at the above snapshot, this is the site. Here click on Themes. You will be directed to the following page.

    Wordpress How to install wordpress themes9

    Look at the above snapshot, on this page you’ll have a lot of options to select themes.

    Select a theme and then click on Download button.

    Theme will be downloaded in zip format in your system.


    AD

    Installing theme

    To install the downloaded theme, you have to login to your WordPress and click on Appearance > Themes.

    Now click on Add New button, following screen will appear in front of you.

    Wordpress How to install wordpress themes10

    Look at the above snapshot, click on Upload Theme button.

    Wordpress How to install wordpress themes11

    Look at the above snapshot, choose the file that you installed and click Install Now.

    Wordpress How to install wordpress themes12

    Look at the above snapshot, once your theme is installed, you will get a successfully installed message. Now click on Activate button, and your theme will be successfully installed.

    Now you can customize it according to your choice.

  • WordPress Themes

    With the help of WordPress theme, you can design the layout and appearance of your website in the front-end.

    When WordPress is installed, it has a pre-installed theme which is very simple and unattractive. But no one wants a website to be that much simple. To make it more attractive one can install and apply different themes from WordPress.

    Themes provide a style (including font styling), colors, page layouts, widget positions, etc. You can change the theme of your site without changing the content of the site. Themes provide a unique look to your site.

    Types of WordPress theme

    There are thousands of themes available on the WordPress. Some are free and some are paid. You can choose a theme according to your choice.

    Free

    WordPress provides many good looking themes absolutely free in the WordPress theme directory. If you are using your site for a small audience or yourself, go for free one. Because there are some chances that same theme is being used by another site.

    Premium

    Premium themes may cost you starting from $1,000. Prize varies depending upon the design and requirement of your site.

    One advantage in premium themes is that they provide a reliable code base and offer support. It gives you a more enhanced security.

    How to make a WordPress theme

    Building a WordPress theme is somewhat technical work. To build a theme you should have a little knowledge about the following development languages.

    • HTML
    • CSS
    • JavaScript
    • PHP
    • Database

    You should know how to use a web server.

    Selecting WordPress Theme

    WordPress theme should be selected very wisely, so that it perfectly fits on your site. You can select any one either paid or free. It should be complemented to your site.

    Themes affect a website in a lot of way. Heavy themes which look great may slow down your website and Google will degrade its ranking. If a theme is not coded properly, it becomes difficult to add any plugin or change that theme.

    Theme selection is very important as everything for your website depends upon theme.

    Given below are some of the points which may help the users to select a theme for their website.

    Look for Simplicity

    Your website should look good, but for that you shouldn’t compromise with your site’s functionality. Theme styling should not be complicated. Complexity will make things difficult for your users. All you need is a good theme, so don’t go for an attractive one compromising your users.

    Responsive

    Your theme should be compatible with all type of screen sizes. A large number of traffic generates from devices other than laptops and PCs. Google also gives better ranking to the responsive sites. Lot of themes is by default responsive but still there are some themes which are not responsive. So look for a theme which is responsive to make your website accessible by all device users.

    Browser Support

    Make sure the theme you select is supported by all the browsers. Before selecting it, test it on different browsers for mobiles as well as laptops like Chrome, Internet Explorer, and Firefox.

    Plugin Support

    Plugins are very important for a WordPress site. They enhance the functionality of your site. Make sure that your selected theme must support all the popular plugins.

    Multilingual Support

    Your theme should support multilingual to support different languages for users.

    Help Option

    Only some developers provide support option with free themes, not all. So, if you messed up with your site then you may have to solve it on your own. So rather than facing all these problems, you should better choose a theme which has a good documentation and support help option.

    SEO Friendliness

    To increase your site performance on search engines, choose a theme which is SEO friendly. Many theme developers will let you know whether their theme is SEO friendly or not.

    Ratings and Reviews

    Before downloading a theme, have a look on its rating and reviews. A theme has both good and bad reviews, but if there are more negative reviews then read it carefully and consider it once again.

  • WordPress Users

    User Role

    User role determines the access permission to the users of a WordPress site.

    There are five user roles:

    • Administrator – An administrator has full rights over a site. They can do anything from adding a post to deleting the other user’s post. They have the authority to design a website by installing plugin and adding themes. They can even change the existing user?s password, delete them or add them.
    • Editor – They deal with content section of a site. They have the right to add, delete, edit, or publish even others posts. They can also add, delete, or edit comments.
    • Author – They only deal with their own posts in all manners like creating, deleting, editing, publishing or uploading images and videos. They can delete their post, even if that is published. They can’t create a new category, they have to choose from the existing one. Although they can add tags to their post.
    • Contributor – A contributor doesn’t have right to publish their post or page. They have to send their post to the administrator to review. And once it is reviewed, it can’t be further edited by the contributor.
    • Subscriber – Users which are subscribed to your site can log in and update their profile. They have the authority to change their passwords when they want. They can only read posts and leave comments on your posts.
    • Follower – They don’t have any right. They can only read and comment on your post. They are only signed up in your site to receive notifications every time when you update a post.
    • Viewer – They can only read and comment on a post.

    How to Add Users

    When a user is registered into your site, you’ll get a notification. So you can edit a user’s role according to your choice.

    Click on Users > Add New

    Wordpress Users1

    Look at the above snapshot, fill all the details and click on Add New User button.

    Wordpress Users2
    Wordpress Users3

    Look at the above snapshot, a message is generated at the top stating, new user created.


    How to Edit Users

    To edit users, go to Users > All Users

    Wordpress Users4

    Look at the above snapshot, this is the list of users.

    Click on a user’s Edit button.

    Wordpress Users5

    Look at the above snapshot, here you can edit and modify the details.


    How to Delete Users

    Click on Users > All Users, users list will appear.

    Wordpress Users6

    Look at the above snapshot, select Delete option.

    Wordpress Users7

    Look at the above snapshot, click Confirm Deletion to delete this user.

    There is one more method to delete a user. Click on Users > All Users

    Wordpress Users8

    Look at the above snapshot, select a user by clicking on checkbox, from drop-down select Delete and then click on Apply button.


  • WordPress Appearance

    Appearance is to manage your theme. From here you can install, delete, update and activate themes. Its menus allow you to change your site’s appearance and behavior.

    Depending upon the theme, some of the appearance menu may not appear to you because some of the options under appearance are theme based.


    How to Manage Theme

    For theme management, go to Themes

    All the installed themes will be displayed. Hover a theme and click it for theme description.

    Wordpress Appearence1

    Look at the above snapshot, these are the themes installed in our site. After clicking on a theme, theme description page will appear in front of you.

    Wordpress Appearence2

    Look at the above snapshot, it displays theme description like version, tags and information. If you want to implement this theme then click on Activate button, and to see the preview of theme click on Live Preview button.

    We have activated a theme and got a message as shown in below snapshot.

    Wordpress Appearence3

    How to Customize Theme

    Theme customizer allows you to design your site with your theme. It gives a new look to your site.

    Go to Appearance > Customize

    Wordpress Appearence4

    Look at the above snapshot, on the left side it is customizing section and on the right side it is the theme we have selected. Any changes made on the left side will be displayed on the right side of the screen.

    At the left side of the screen, following options are present,

    • Active Theme –It shows which theme is currently activated on your site. On our site, Twenty Fourteen theme is activated.
    • Site Identity – It specifies basic site information.
    • Colors – This option allows you to change the color of your site by changing site color and background color.
    • Header Image – It will select an image for the header of your site.
    • Background Image – Select an image for your background from here.
    • Menus – Select the menu type to appear on your site.
    • Widgets – Themes have sidebars either on left or right. You can add, remove, move up or down widgets into sidebars according to your choice.Wordpress Appearence14
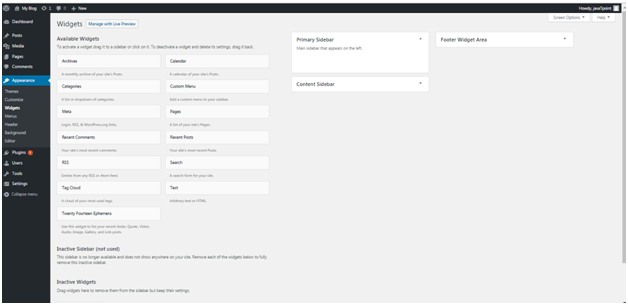
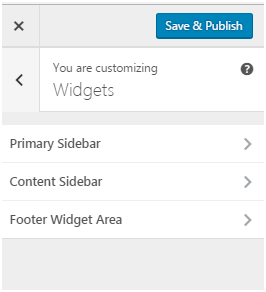
Look at the above snapshot, you can move the widgets according to your need in all the three sidebars.Wordpress Appearence15Look at the above snapshot, we have added Recent posts widget in the Footer widget area. Just choose a widget from the given options and it will be on your sidebar menu.
    • Static Front Page – Home page will be either static or display latest posts.

    How to Manage Widget

    Widgets are like blocks having specific codes for different functions. In any sidebar you can add and remove widget as per need through drag and drop.

    Wordpress Appearence17

    Look at the above snapshot, following options are available,

    Available widgets, these are available to you to add to the sidebar.

    Inactive sidebar (not used), these are not used.

    Inactive widgets, these are the removed widgets from sidebar.

  • WordPress Links

    We can add/edit/delete links on WordPress posts, pages, text widgets and navigation menus. Let’s see the 3 ways to add a link in WordPress..

    • Add a link in WordPress posts and pagesAdd a link in WordPress text widgetsAdd a link in WordPress navigation menusHow to Delete WordPress Links

  • WordPress Categories vs Tags

    Earlier only categories were available in WordPress to divide the posts. But to describe a post more specifically more categories were used. This made the category list very long. To avoid this, we have tags.

    Categories are broad-ranging. It helps your users to identify what your blog is about. For a post, there may be sub-categories which make a hierarchy of category. It is possible for a post to have more than one category but it is best for a post to have a single category. A post must have at least one category.

    Tags are like categories but they are used to describe a post more specifically. In some posts you may not need to use a tag. Tags are not needed in every post.

    Multiple categories may confuse the readers. If you want to provide additional grouping in a post use tags. Tag should be relevant to the topic covered in the post. For example, if you Google for “ladies watch”. Here watch is category and ladies is tag.


    SEO effect from Category and Tag

    Wise use of tag and category can increase traffic to your site via search engines. If both are used together, they will increase your site’s usability.

    Having internal links will let your sites content to be discovered by the search engine. Tags and categories will clue the search engines about your website topic and your site will be ranked for those targeted keywords.


    Optimal number of Categories and Tags

    There is no defined limit to use category for a post. However, for simplicity sub-categories are used when more categories are needed for a single post.

    For tags also there is specific limit. You can add 100 tags in a post. Tags are used to help in searching of a post. So it is necessary to use relevant keywords related to your post.


    Assigning one Post under multiple Categories

    Some people used to say that using multiple categories for a single post can result SEO in a negative way or you can be penalized for duplicate content. But it is not entirely true.

    Basic use of category is to sort the content on your site for your users so that they could find it easily. It is better to use sub-categories or tags than multiple categories.

    Overall there is no SEO advantage in multiple categories. Only consider about your targeted audience and not the search engine. If your decision will be according to your viewers, it will increase your visitors and your site?s SEO will automatically increase.

  • WordPress Tags

    What are Tags

    With the help of tags, similar posts can be grouped together. Hence, it makes easier for the users to search a particular post. It tells the user what a post is about. Tags are similar to categories but still different.

    Position of the tag may differ depending on the theme. Sometimes they may appear at the bottom, top, or in the sidebar.

    Wordpress WordPress tags1

    How to Add a Tag

    To add a tag, go to Posts > Tags

    Wordpress WordPress tags2

    Look at the above snapshot, here you have to fill all the fields.

    Name – Name of tag which must be unique. Here it is shopping destinations.

    Slug – It describes a post in URL. It is generally in lowercase and contains only letters, numbers and hyphens. Here our slug it shopping.

    Description – It is a brief intro about the tag. When you hover (bring pointer over the tag) the tag, this description is displayed.

    After filling all the above information, click on Add New Tag button.

    Following screen will appear in front of you.

    Wordpress WordPress tags3

    Look at the above snapshot, on the right side, created tag is displayed.


    How to Edit Tag

    To edit a tag, go to Posts > Tag and bring the mouse over the tag.

    Wordpress WordPress tags4

    Look at the above snapshot, two options to edit are there.

    On clicking Edit, following page will appear.

    Wordpress WordPress tags5

    Look at the above snapshot, after editing click on Update button.

    On clicking Quick Edit, following page will appear.

    Wordpress WordPress tags6

    Look at the above snapshot, here you can only edit Name and Slug of the tag. After editing, click on Update Tag button.


    How to Delete Tag

    To delete a tag, go to Post > Tag and bring the mouse over the tag.

    AD

    https://delivery.adrecover.com/recover.html?siteId=37784&dataDogLoggingEnabled=false&dataDogLoggingVersion=1
    Wordpress WordPress tags7

    Look at the above snapshot, click on Delete option and your Tag will be deleted.

  • WordPress Categories

    What is a category

    Categories allow a user to divide its content into different sections. Different topics publishing in a single website can be divided into different categories. It tells the reader what a post is about and they can easily find their content from a lot.

    If no category is added, then by default category is uncategorized. To access category section click Posts > Categories

    Wordpress WordPress categories1

    Look at the above snapshot, this is the category section.


    How to add categories

    Wordpress WordPress categories2

    Look at the above snapshot, there are four fields to be filled when adding a new category.

    Name – Name of category which has to be unique

    Slug – It is used in the URL to display your category. For example, if your category is Clothing and slug is women, then your URL will be like shopping.com/shop/women.

    Parent – Here, you can add sub-categories to a category or you can choose none. This is optional.

    Description – Descriptions are optional. You can add a brief description to your category.

    After filling all the above entries, click on Add New Category button. On the right side of the page your new category will be added.

    Wordpress WordPress categories3

    Look at the above snapshot, our new category clothing is added in the category list.


    How to Edit Category

    To edit a category, go to Posts > Categories. Hover your mouse to the category you want to edit.

    Wordpress WordPress categories4

    Look at the above snapshot, there are several options to Edit, Quick Edit and Delete. Here you can change category name, slug, parent and description.

    Edit – It allows you to edit all the fields name, slug, parent and description.

    Quick Edit – it only allows you to edit name and slug.


    How to Delete Category

    You can also delete categories from the above snapshot. By deleting a category, its posts will not be deleted instead they will be transferred to by default category (if that post will not be listed under any other category).

    Please remember you can’t delete a by default category, before deleting it assign by default status to some other category.


    How to Convert Category into Tag

    Categories and tags both are different things in WordPress. Categories are sections while tags are keywords. WordPress provide you n option to change category into tag and tag into category.

    Go to Tools > Import, following screen will appear.

    Wordpress WordPress categories5

    Look at the above snapshot, there is an option of Categories and Tags Converter. It is asking for installation. Click on Install Now button.

    Wordpress WordPress categories6

    Look at the above snapshot, after installation click on Run Importer.

    Wordpress WordPress categories7

    Look at the above snapshot, you can select any option either to convert categories to tags or tags to categories.

  • WordPress Comments

    Comments allow a user to interact with the blogger or website team. It helps in many ways, like you’ll get to know what your viewers want from you. What else you can do for your viewers. You can activate or deactivate comment box. Comments are by default enabled.


    Discussion or Comment Setting Page

    Click on Settings > Discussions

    You will be on Discussion Settings page.

    Wordpress WordPress comment1

    Look at the above snapshot, there are many default options.

    First part is for Default article settings, applies to all your pages, posts, etc.


    How to Enable or Disable Comment

    Go to Pages > All Pages

    Select any one of the page you want to add comment.

    Wordpress WordPress comment2

    Look at the above snapshot, on the top right, there is a drop-down option. Click it.

    Wordpress WordPress comment3

    Look at the above snapshot, check the Discussions and Comments box.

    Wordpress WordPress comment4

    Look at the above snapshot, there are two checkboxes,

    Allow comments – Allow your viewers to add comment on your post.

    Allow trackbacks and pingbacks on this page – Viewers can ping and trackback.

    Lastly click on Update button to update your post.


    How to Edit Comment

    To edit comments, go to Comments side menu,

    Wordpress WordPress comment5

    Look at the above snapshot, this is the comment page. Select a comment and click Edit.

    Wordpress WordPress comment6

    Look at the above snapshot, you can edit the comment here and then click Update.


    AD

    https://delivery.adrecover.com/recover.html?siteId=37784&dataDogLoggingEnabled=false&dataDogLoggingVersion=1

    What is Moderate Comment

    Comments by the visitors on a post are not published directly unless it is approved by the admin. This is called Moderation. You can change comment moderation settings. Go to Settings > Discussions

    When you’ll scroll down the page little bit, you’ll see following option.

    Wordpress WordPress comment7

    Look at the above snapshot, check the option Comment must be manually approved.


    How to allow only registered users to Comment

    You can allow only registered users to comment on your post. For that, go to Settings > General

    Following page will appear.

    Wordpress WordPress comment8

    Look at the above snapshot, check the box Anyone can register.

    And if you don’t want a new user to write post on your site then save the column New user Default Role as Subscriber.

    Now go to Settings > Discussions

    Wordpress WordPress comment9

    Look at the above snapshot, check the box Users must be registered and logged in to comment.


    How to Receive Notification for Comment

    You can receive a notification whenever someone leaves a comment on your site or waiting to be approved.

    You will not receive a notification for a comment marked as spam.

    To receive notifications, go to Settings > Discussions

    Wordpress WordPress comment10

    Look at the above snapshot, check the boxes under Email me Whenever to enable notifications.


    What is Avatar or Gravatar

    Word Avatar is used for user’s profile image in online communications. Gravatar is a web based service which allows its users to use avatar image. When a user creates an account in WordPress, it searches for gravatar image matching user’s email address. If user has a gravatar account with an image then this image is displayed as their profile pictures in comments and if not then default avatar image is set.

    The default image in WordPress is Mystery Man. You can change it by clicking on Settings > Discussions

    Wordpress WordPress comment11

    Look at the above snapshot, by unchecking Show Avatars, Avatar image will not be there in your website.

    Default images can be selected from mystery man and blank image. Other images are selected using algorithms that generate an image based on user’s email address.