Blog

  • PHP Classes and Objects

    What is Object Oriented Programming

    Object-Oriented Programming (OOP) is a programming model that is based on the concept of classes and objects. As opposed to procedural programming where the focus is on writing procedures or functions that perform operations on the data, in object-oriented programming the focus is on the creations of objects which contain both data and functions together.

    Object-oriented programming has several advantages over conventional or procedural style of programming. The most important ones are listed below:

    • It provides a clear modular structure for the programs.
    • It helps you adhere to the “don’t repeat yourself” (DRY) principle, and thus make your code much easier to maintain, modify and debug.
    • It makes it possible to create more complicated behavior with less code and shorter development time and high degree of reusability.

    The following sections will describe how classes and objects work in PHP.

    Tip: The idea behind Don’t Repeat Yourself (DRY) principle is reducing the repetition of code by abstracting out the code that are common for the application and placing them at a single place and reuse them instead of repeating it.


    Understanding Classes and Objects

    Classes and objects are the two main aspects of object-oriented programming. A class is a self-contained, independent collection of variables and functions which work together to perform one or more specific tasks, while objects are individual instances of a class.

    A class acts as a template or blueprint from which lots of individual objects can be created. When individual objects are created, they inherit the same generic properties and behaviors, although each object may have different values for certain properties.

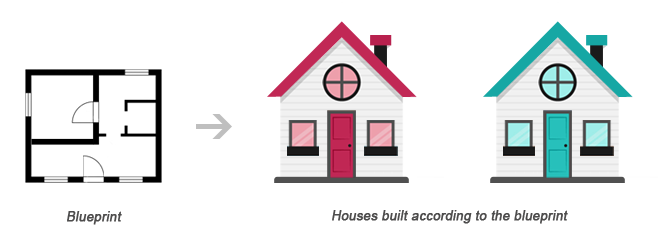
    For example, think of a class as a blueprint for a house. The blueprint itself is not a house, but is a detailed plan of the house. While, an object is like an actual house built according to that blueprint. We can build several identical houses from the same blueprint, but each house may have different paints, interiors and families inside, as shown in the illustration below.

    Class Object Relationship Illustration

    A class can be declared using the class keyword, followed by the name of the class and a pair of curly braces ({}), as shown in the following example.

    Let’s create a PHP file named Rectangle.php and put the following example code inside it so that our class code should be separated from rest of the program. We can then use it wherever it’s needed by simply including the Rectangle.php file.

    Example

    <?php
    class Rectangle
    {
        // Declare  properties
        public $length = 0;
        public $width = 0;
        
        // Method to get the perimeter
        public function getPerimeter(){
            return (2 * ($this->length + $this->width));
        }
        
        // Method to get the area
        public function getArea(){
            return ($this->length * $this->width);
        }
    }
    ?>

    The public keyword before the properties and methods in the example above, is an access modifier, which indicates that this property or method is accessible from anywhere. We will learn more about this a little later in this chapter.

    Note: Syntactically, variables within a class are called properties, whereas functions are called methods. Also class names conventionally are written in PascalCase i.e. each concatenated word starts with an uppercase letter (e.g. MyClass).

    Once a class has been defined, objects can be created from the class with the new keyword. Class methods and properties can directly be accessed through this object instance.

    Create another PHP file name test.php and put the following code inside it.

    Example

    <?php
    // Include class definition
    require "Rectangle.php";
     
    // Create a new object from Rectangle class
    $obj = new Rectangle;
     
    // Get the object properties values
    echo $obj->length; // 0utput: 0
    echo $obj->width; // 0utput: 0
     
    // Set object properties values
    $obj->length = 30;
    $obj->width = 20;
     
    // Read the object properties values again to show the change
    echo $obj->length; // 0utput: 30
    echo $obj->width; // 0utput: 20
     
     
    // Call the object methods
    echo $obj->getPerimeter(); // 0utput: 100
    echo $obj->getArea(); // Output: 600
    ?>

    The arrow symbol (->) is an OOP construct that is used to access contained properties and methods of a given object. Whereas, the pseudo-variable $this provides a reference to the calling object i.e. the object to which the method belongs.

    The real power of object oriented programming becomes evident when using multiple instances of the same class, as shown in the following example:

    Example

    <?php
    // Include class definition
    require "Rectangle.php";
     
    // Create multiple objects from the Rectangle class
    $obj1 = new Rectangle;
    $obj2 = new Rectangle;
     
    // Call the methods of both the objects
    echo $obj1->getArea(); // Output: 0
    echo $obj2->getArea(); // Output: 0
     
    // Set $obj1 properties values
    $obj1->length = 30;
    $obj1->width = 20;
     
    // Set $obj2 properties values
    $obj2->length = 35;
    $obj2->width = 50;
     
    // Call the methods of both the objects again
    echo $obj1->getArea(); // Output: 600
    echo $obj2->getArea(); // Output: 1750
    ?>

    As you can see in the above example, calling the getArea() method on different objects causes that method to operate on a different set of data. Each object instance is completely independent, with its own properties and methods, and thus can be manipulated independently, even if they’re of the same class.


    Using Constructors and Destructors

    To make the object-oriented programming easier, PHP provides some magic methods that are executed automatically when certain actions occur within an object.

    For example, the magic method __construct() (known as constructor) is executed automatically whenever a new object is created. Similarly, the magic method __destruct() (known as destructor) is executed automatically when the object is destroyed. A destructor function cleans up any resources allocated to an object once the object is destroyed.

    Example

    <?php
    class MyClass
    {
        // Constructor
        public function __construct(){
            echo 'The class "' . __CLASS__ . '" was initiated!<br>';
        }
        
        // Destructor
        public function __destruct(){
            echo 'The class "' . __CLASS__ . '" was destroyed.<br>';
        }
    }
     
    // Create a new object
    $obj = new MyClass;
     
    // Output a message at the end of the file
    echo "The end of the file is reached.";
    ?>

    The PHP code in the above example will produce the following output:

    The class “MyClass” was initiated!
    The end of the file is reached.
    The class “MyClass” was destroyed.

    A destructor is called automatically when a scripts ends. However, to explicitly trigger the destructor, you can destroy the object using the PHP unset() function, as follow:

    Example

    <?php
    class MyClass
    {
        // Constructor
        public function __construct(){
            echo 'The class "' . __CLASS__ . '" was initiated!<br>';
        }
        
        // Destructor
        public function __destruct(){
        echo 'The class "' . __CLASS__ . '" was destroyed.<br>';
        }
    }
     
    // Create a new object
    $obj = new MyClass;
     
    // Destroy the object
    unset($obj);
     
    // Output a message at the end of the file
    echo "The end of the file is reached.";
    ?>

    Now, the PHP code in the above example will produce the following output:

    The class “MyClass” was initiated!
    The class “MyClass” was destroyed.
    The end of the file is reached.

    Tip: PHP automatically clean up all resources allocated during execution when the script is finished, e.g. closing database connections, destroying objects, etc.

    Note: The __CLASS__ is a magic constant which contains the name of the class in which it is occur. It is empty, if it occurs outside of the class.


    Extending Classes through Inheritance

    Classes can inherit the properties and methods of another class using the extends keyword. This process of extensibility is called inheritance. It is probably the most powerful reason behind using the object-oriented programming model.

    Example

    <?php
    // Include class definition
    require "Rectangle.php";
     
    // Define a new class based on an existing class
    class Square extends Rectangle
    {   
        // Method to test if the rectangle is also a square
        public function isSquare(){
            if($this->length == $this->width){
                return true; // Square
            } else{
                return false; // Not a square
            }
        }
    }
     
    // Create a new object from Square class
    $obj = new Square;
     
    // Set object properties values
    $obj->length = 20;
    $obj->width = 20;
     
    // Call the object methods
    if($obj->isSquare()){
        echo "The area of the square is ";
    } else{
        echo "The area of the rectangle is ";
    };
    echo $obj->getArea();
    ?>

    The PHP code in the above example will produce the following output:

    The area of the square is 400

    As you can see in the above example, even though the class definition of Square doesn’t explicitly contain getArea() method nor the $length and $width property, instances of the Square class can use them, as they inherited from the parent Rectangle class.

    Tip: Since a child class is derived from a parent class, it is also referred to as a derived class, and its parent is called the base class.


    Controlling the Visibility of Properties and Methods

    When working with classes, you can even restrict access to its properties and methods using the visibility keywords for greater control. There are three visibility keywords (from most visible to least visible): publicprotectedprivate, which determines how and from where properties and methods can be accessed and modified.

    • public — A public property or method can be accessed anywhere, from within the class and outside. This is the default visibility for all class members in PHP.
    • protected — A protected property or method can only be accessed from within the class itself or in child or inherited classes i.e. classes that extends that class.
    • private — A private property or method is accessible only from within the class that defines it. Even child or inherited classes cannot access private properties or methods.

    The following example will show you how this visibility actually works:

    Example

    <?php
    // Class definition
    class Automobile
    {
        // Declare  properties
        public $fuel;
        protected $engine;
        private $transmission;
    }
    class Car extends Automobile
    {
        // Constructor
        public function __construct(){
            echo 'The class "' . __CLASS__ . '" was initiated!<br>';
        }
    }
     
    // Create an object from Automobile class
    $automobile = new Automobile;
     
    // Attempt to set $automobile object properties
    $automobile->fuel = 'Petrol'; // ok
    $automobile->engine = '1500 cc'; // fatal error
    $automobile->transmission = 'Manual'; // fatal error
     
    // Create an object from Car class
    $car = new Car;
     
    // Attempt to set $car object properties
    $car->fuel = 'Diesel'; // ok
    $car->engine = '2200 cc'; // fatal error
    $car->transmission = 'Automatic'; // undefined
    ?>

    Static Properties and Methods

    In addition to the visibility, properties and methods can also be declared as static, which makes them accessible without needing an instantiation of the class. Static properties and methods can be accessed using the scope resolution operator (::), like this: ClassName::$property and ClassName::method().

    A property declared as static cannot be accessed via the object of that class though a static method can be, as demonstrated in the following example:

    Example

    <?php
    // Class definition
    class HelloClass
    {
        // Declare a static property
        public static $greeting = "Hello World!";
        
        // Declare a static method
        public static function sayHello(){
            echo self::$greeting;
        }
    }
    // Attempt to access static property and method directly
    echo HelloClass::$greeting; // Output: Hello World!
    HelloClass::sayHello(); // Output: Hello World!
     
    // Attempt to access static property and method via object
    $hello = new HelloClass;
    echo $hello->greeting; // Strict Warning
    $hello->sayHello(); // Output: Hello World!
    ?>

    The keyword self in the above example means “the current class”. It is never preceded by a dollar sign ($) and always followed by the :: operator (e.g. self::$name).

    The self keyword is different from the this keyword which means “the current object” or  “the current instance of a class”. The this keyword is always preceded by a dollar sign ($) and followed by the -> operator (e.g. $this->name).

    Note: Since static methods can be called without an instance of a class (i.e. object), the pseudo-variable $this is not available inside the method declared as static.

    We hope you’ve understood the basic concepts of object-oriented programming by now. You’ll find more examples on OOP in PHP and MySQL database section.

  • PHP Error Handling

    Handling Errors

    Sometimes your application will not run as it supposed to do, resulting in an error. There are a number of reasons that may cause errors, for example:

    • The Web server might run out of disk space
    • A user might have entered an invalid value in a form field
    • The file or database record that you were trying to access may not exist
    • The application might not have permission to write to a file on the disk
    • A service that the application needs to access might be temporarily unavailable

    These types of errors are known as runtime errors, because they occur at the time the script runs. They are distinct from syntax errors that need to be fixed before the script will run.

    A professional application must have the capabilities to handle such runtime error gracefully. Usually this means informing the user about the problem more clearly and precisely.

    Understanding Error Levels

    Usually, when there’s a problem that prevents a script from running properly, the PHP engine triggers an error. Each error is represented by an integer value and an associated constant. The following table list some of the common error levels:

    Error LevelValueDescription
    E_ERROR1A fatal run-time error, that can’t be recovered from. The execution of the script is stopped immediately.
    E_WARNING2A run-time warning. It is non-fatal and most errors tend to fall into this category. The execution of the script is not stopped.
    E_NOTICE8A run-time notice. Indicate that the script encountered something that could possibly an error, although the situation could also occur when running a script normally.
    E_USER_ERROR256A fatal user-generated error message. This is like an E_ERROR, except it is generated by the PHP script using the function trigger_error() rather than the PHP engine.
    E_USER_WARNING512A non-fatal user-generated warning message. This is like an E_WARNING, except it is generated by the PHP script using the function trigger_error() rather than the PHP. engine
    E_USER_NOTICE1024A user-generated notice message. This is like an E_NOTICE, except it is generated by the PHP script using the function trigger_error() rather than the PHP engine.
    E_STRICT2048Not strictly an error, but triggered whenever PHP encounters code that could lead to problems or forward incompatibilities
    E_ALL8191All errors and warnings, except of E_STRICT prior to PHP 5.4.0.

    For more error levels, please check out the reference on PHP Error Levels.

    The PHP engine triggers an error whenever it encounters a problem with your script, but you can also trigger errors yourself to generate more user friendly error messages. This way you can make your application more sofisticated. The following section describes some of common methods used for handling errors in PHP:

    Basic Error Handling Using the die() Function

    Consider the following example that simply tries to open a text file for reading only.

    Example

    Download

    <?php
    // Try to open a non-existent file
    $file = fopen("sample.txt", "r");
    ?>

    If the file does not exist you might get an error like this:

    Warning: fopen(sample.txt) [function.fopen]: failed to open stream: No such file or directory in C:\wamp\www\project\test.php on line 2

    If we follow some simple steps we can prevent the users from getting such error message.

    Example

    Download

    <?php
    if(file_exists("sample.txt")){
        $file = fopen("sample.txt", "r");
    } else{
        die("Error: The file you are trying to access doesn't exist.");
    }
    ?>

    Now if you run the above script you will get the error message like this:

    Error: The file you are trying to access doesn’t exist.

    As you can see by implementing a simple check whether the file exist or not before trying to access it, we can generate an error message that is more meaningful to the user.

    The die() function used above simply display the custom error message and terminate the current script if ‘sample.txt’ file is not found.


    Creating a Custom Error Handler

    You can create your own error handler function to deal with the run-time error generated by PHP engine. The custom error handler provides you greater flexibility and better control over the errors, it can inspect the error and decide what to do with the error, it might display a message to the user, log the error in a file or database or send by e-mail, attempt to fix the problem and carry on, exit the execution of the script or ignore the error altogether.

    The custom error handler function must be able to handle at least two parameters (errno and errstr), however it can optionally accept an additional three parameters (errfile, errline, and errcontext), as described below:

    ParameterDescription
    Required — The following parameters are required
    errnoSpecifies the level of the error, as an integer. This corresponds to the appropriate error level constant ( E_ERRORE_WARNING, and so on)
    errstrSpecifies the error message as a string
    Optional — The following parameters are optional
    errfileSpecifies the filename of the script file in which the error occurred, as a string
    errlineSpecifies the line number on which the error occurred, as a string
    errcontextSpecifies an array containing all the variables and their values that existed at the time the error occurred. Useful for debugging

    Here’s an example of a simple custom error handling function. This handler, customError() is triggered whenever an error occurred, no matter how trivial. It then outputs the details of the error to the browser and stops the execution of the script.

    Example

    <?php
    // Error handler function
    function customError($errno, $errstr){
        echo "<b>Error:</b> [$errno] $errstr";
    }
    ?>

    You need to tell the PHP to use your custom error handler function — just call the built-in set_error_handler() function, passing in the name of the function.

    Example

    <?php
    // Error handler function
    function customError($errno, $errstr){
        echo "<b>Error:</b> [$errno] $errstr";
    }
     
    // Set error handler
    set_error_handler("customError");
     
    // Trigger error
    echo($test);
    ?>

    Error Logging

    Log Error Messages in a Text File

    You can also logs details of the error to the log file, like this:

    Example

    <?php
    function calcDivision($dividend, $divisor){
        if($divisor == 0){
            trigger_error("calcDivision(): The divisor cannot be zero", E_USER_WARNING);
            return false;
        } else{
            return($dividend / $divisor);
        }
    }
    function customError($errno, $errstr, $errfile, $errline, $errcontext){
        $message = date("Y-m-d H:i:s - ");
        $message .= "Error: [" . $errno ."], " . "$errstr in $errfile on line $errline, ";
        $message .= "Variables:" . print_r($errcontext, true) . "\r\n";
        
        error_log($message, 3, "logs/app_errors.log");
        die("There was a problem, please try again.");
    }
    set_error_handler("customError");
    echo calcDivision(10, 0);
    echo "This will never be printed.";
    ?>

    Send Error Messages by E-Mail

    You can also send e-mail with the error details using the same error_log() function.

    Example

    <?php
    function calcDivision($dividend, $divisor){
        if ($divisor == 0){
            trigger_error("calcDivision(): The divisor cannot be zero", E_USER_WARNING);
            return false;
        } else{
            return($dividend / $divisor);
        }
    }
    function customError($errno, $errstr, $errfile, $errline, $errcontext){
        $message = date("Y-m-d H:i:s - ");
        $message .= "Error: [" . $errno ."], " . "$errstr in $errfile on line $errline, ";
        $message .= "Variables:" . print_r($errcontext, true) . "\r\n";
        
        error_log($message, 1, "[email protected]");
        die("There was a problem, please try again. Error report submitted to webmaster.");
    }
    set_error_handler("customError");
    echo calcDivision(10, 0);
    echo "This will never be printed.";
    ?>

    Trigger an Error

    Although the PHP engine triggers an error whenever it encounters a problem with your script, however you can also trigger errors yourself. This can help to make your application more robust, because it can flag potential problems before they turn into serious errors.

    To trigger an error from within your script, call the trigger_error() function, passing in the error message that you want to generate:

    trigger_error(“There was a problem.”);

    Consider the following function that calculates division of the two numbers.

    Example

    <?php
    function calcDivision($dividend, $divisor){
        return($dividend / $divisor);
    }
     
    // Calling the function
    echo calcDivision(10, 0);
    ?>

    If a value of zero (0) is passed as the $divisor parameter, the error generated by the PHP engine will look something like this:

    Warning: Division by zero in C:\wamp\www\project\test.php on line 3

    This message doesn’t look very informative. Consider the following example that uses the trigger_error() function to generate the error.

    Example

    <?php
    function calcDivision($dividend, $divisor){
        if($divisor == 0){
            trigger_error("The divisor cannot be zero", E_USER_WARNING);
            return false;
        } else{
            return($dividend / $divisor);
        }
    }
     
    // Calling the function
    echo calcDivision(10, 0);
    ?>

    Now the script generates this error message:

    Warning: The divisor cannot be zero in C:\wamp\www\project\error.php on line 4

    As you can see the error message generated by the second example explains the problem more clearly as compared to the previous one.

  • PHP Filters

    Validating and Sanitizing Data with Filters

    Sanitizing and validating user input is one of the most common tasks in a web application. To make this task easier PHP provides native filter extension that you can use to sanitize or validate data such as e-mail addresses, URLs, IP addresses, etc.

    To validate data using filter extension you need to use the PHP’s filter_var() function. The basic syntax of this function can be given with:

    filter_var(variablefilteroptions)

    This function takes three parameters out of which the last two are optional. The first parameter is the value to be filtered, the second parameter is the ID of the filter to apply, and the third parameter is the array of options related to filter. Let’s see how it works.

    Sanitize a String

    The following example will sanitize a string by removing all HTML tags from it:

    Example

    <?php
    // Sample user comment
    $comment = "<h1>Hey there! How are you doing today?</h1>";
     
    // Sanitize and print comment string
    $sanitizedComment = filter_var($comment, FILTER_SANITIZE_STRING);
    echo $sanitizedComment;
    ?>

    The output of the above example will look something like this:

    Hey there! How are you doing today?


    Validate Integer Values

    The following example will validate whether the value is a valid integer or not.

    Example

    <?php
    // Sample integer value
    $int = 20;
     
    // Validate sample integer value
    if(filter_var($int, FILTER_VALIDATE_INT)){
        echo "The <b>$int</b> is a valid integer";
    } else{
        echo "The <b>$int</b> is not a valid integer";
    }
    ?>

    In the above example, if variable $int is set to 0, the example code will display invalid integer message. To fix this problem, you need to explicitly test for the value 0, as follow:

    Example

    <?php
    // Sample integer value
    $int = 0;
     
    // Validate sample integer value
    if(filter_var($int, FILTER_VALIDATE_INT) === 0 || filter_var($int, FILTER_VALIDATE_INT)){
        echo "The <b>$int</b> is a valid integer";
    } else{
        echo "The <b>$int</b> is not a valid integer";
    }
    ?>

    Validate IP Addresses

    The following example will validate whether the value is a valid IP address or not.

    Example

    <?php
    // Sample IP address
    $ip = "172.16.254.1";
     
    // Validate sample IP address
    if(filter_var($ip, FILTER_VALIDATE_IP)){
        echo "The <b>$ip</b> is a valid IP address";
    } else {
        echo "The <b>$ip</b> is not a valid IP address";
    }
    ?>

    You can further apply validation for IPV4 or IPV6 IP addresses by using the FILTER_FLAG_IPV4 or FILTER_FLAG_IPV6 flags, respectively. Here’s an example:

    Example

    <?php
    // Sample IP address
    $ip = "172.16.254.1";
     
    // Validate sample IP address
    if(filter_var($ip, FILTER_VALIDATE_IP, FILTER_FLAG_IPV6)){
        echo "The <b>$ip</b> is a valid IPV6 address";
    } else {
        echo "The <b>$ip</b> is not a valid IPV6 address";
    }
    ?>

    Sanitize and Validate Email Addresses

    The following example will show you how to sanitize and validate an e-mail address.

    Example

    <?php
    // Sample email address
    $email = "someone@@example.com";
     
    // Remove all illegal characters from email
    $sanitizedEmail = filter_var($email, FILTER_SANITIZE_EMAIL);
     
    // Validate email address
    if($email == $sanitizedEmail && filter_var($email, FILTER_VALIDATE_EMAIL)){
        echo "The $email is a valid email address";
    } else{
        echo "The $email is not a valid email address";
    }
    ?>

    Note: The FILTER_SANITIZE_EMAIL filter removes all invalid characters from the provided email address string except letters, digits and !#$%&'*+-=?^_`{|}~@.[].


    Sanitize and Validate URLs

    The following example will show you how to sanitize and validate a url.

    Example

    <?php
    // Sample website url
    $url = "http:://www.example.com";
     
    // Remove all illegal characters from url
    $sanitizedUrl = filter_var($url, FILTER_SANITIZE_URL);
     
    // Validate website url
    if($url == $sanitizedUrl && filter_var($url, FILTER_VALIDATE_URL)){
        echo "The $url is a valid website url";
    } else{
        echo "The $url is not a valid website url";
    }
    ?>

    Note: The FILTER_SANITIZE_URL filter removes all invalid characters from the provided URL string except letters, digits and $-_.+!*'(),{}|\\^~[]`<>#%";/?:@&=.

    You can also check whether a URL contains query string or not by using the flag FILTER_FLAG_QUERY_REQUIRED, as shown in the following example:

    Example

    <?php
    // Sample website url
    $url = "http://www.example.com?topic=filters";
     
    // Validate website url for query string
    if(filter_var($url, FILTER_VALIDATE_URL, FILTER_FLAG_QUERY_REQUIRED)){
        echo "The <b>$url</b> contains query string";
    } else{
        echo "The <b>$url</b> does not contain query string";
    }
    ?>

    See the tutorial on HTML URL to learn about the different components of a URL.


    Validate Integers Within a Range

    The following example will validate whether the supplied value is an integer or not, as well as whether it lies within the range of 0 to 100 or not.

    Example

    <?php
    // Sample integer value
    $int = 75;
     
    // Validate sample integer value
    if(filter_var($int, FILTER_VALIDATE_INT, array("options" => array("min_range" => 0,"max_range" => 100)))){
        echo "The <b>$int</b> is within the range of 0 to 100";
    } else{
        echo "The <b>$int</b> is not within the range of 0 to 100";
    }
    ?>
  • PHP Form Validation

    Sanitizing and Validating Form Data

    As you have seen in the previous tutorial, the process of capturing and displaying the submitted form data is quite simple. In this tutorial you will learn how to implement a simple contact form on your website that allows the user to send their comment and feedback through email. We will use the same PHP mail() function to send the emails.

    We are also going to implement some basic security feature like sanitization and validation of the user’s input so that user can not insert potentially harmful data that compromise the website security or might break the application.

    The following is our all-in-one PHP script which does the following things:

    • It will ask the users to enter his comments about the website.
    • The same script displays the contact form and process the submitted form data.
    • The script sanitizes and validates the user inputs. If any required field (marked with *) is missing or validation failed due to incorrect inputs the script redisplays the form with an error message for corresponding form field.
    • The script remembers which fields the user has already filled in, and prefills those fields when the form redisplayed due to validation error.
    • If the data submitted by the user are acceptable and everything goes well it will send an email to the website administrator and display a success message to the user.

    Type the following code in “contact.php” file and save in your project root directory:

    Example

    <?php
    // Functions to filter user inputs
    function filterName($field){
        // Sanitize user name
        $field = filter_var(trim($field), FILTER_SANITIZE_STRING);
        
        // Validate user name
        if(filter_var($field, FILTER_VALIDATE_REGEXP, array("options"=>array("regexp"=>"/^[a-zA-Z\s]+$/")))){
            return $field;
        } else{
            return FALSE;
        }
    }    
    function filterEmail($field){
        // Sanitize e-mail address
        $field = filter_var(trim($field), FILTER_SANITIZE_EMAIL);
        
        // Validate e-mail address
        if(filter_var($field, FILTER_VALIDATE_EMAIL)){
            return $field;
        } else{
            return FALSE;
        }
    }
    function filterString($field){
        // Sanitize string
        $field = filter_var(trim($field), FILTER_SANITIZE_STRING);
        if(!empty($field)){
            return $field;
        } else{
            return FALSE;
        }
    }
     
    // Define variables and initialize with empty values
    $nameErr = $emailErr = $messageErr = "";
    $name = $email = $subject = $message = "";
     
    // Processing form data when form is submitted
    if($_SERVER["REQUEST_METHOD"] == "POST"){
     
        // Validate user name
        if(empty($_POST["name"])){
            $nameErr = "Please enter your name.";
        } else{
            $name = filterName($_POST["name"]);
            if($name == FALSE){
                $nameErr = "Please enter a valid name.";
            }
        }
        
        // Validate email address
        if(empty($_POST["email"])){
            $emailErr = "Please enter your email address.";     
        } else{
            $email = filterEmail($_POST["email"]);
            if($email == FALSE){
                $emailErr = "Please enter a valid email address.";
            }
        }
        
        // Validate message subject
        if(empty($_POST["subject"])){
            $subject = "";
        } else{
            $subject = filterString($_POST["subject"]);
        }
        
        // Validate user comment
        if(empty($_POST["message"])){
            $messageErr = "Please enter your comment.";     
        } else{
            $message = filterString($_POST["message"]);
            if($message == FALSE){
                $messageErr = "Please enter a valid comment.";
            }
        }
        
        // Check input errors before sending email
        if(empty($nameErr) && empty($emailErr) && empty($messageErr)){
            // Recipient email address
            $to = '[email protected]';
            
            // Create email headers
            $headers = 'From: '. $email . "\r\n" .
            'Reply-To: '. $email . "\r\n" .
            'X-Mailer: PHP/' . phpversion();
            
            // Sending email
            if(mail($to, $subject, $message, $headers)){
                echo '<p class="success">Your message has been sent successfully!</p>';
            } else{
                echo '<p class="error">Unable to send email. Please try again!</p>';
            }
        }
    }
    ?>
    <!DOCTYPE html>
    <html lang="en">
    <head>
        <meta charset="UTF-8">
        <title>Contact Form</title>
        <style type="text/css">
            .error{ color: red; }
            .success{ color: green; }
        </style>
    </head>
    <body>
        <h2>Contact Us</h2>
        <p>Please fill in this form and send us.</p>
        <form action="contact.php" method="post">
            <p>
                <label for="inputName">Name:<sup>*</sup></label>
                <input type="text" name="name" id="inputName" value="<?php echo $name; ?>">
                <span class="error"><?php echo $nameErr; ?></span>
            </p>
            <p>
                <label for="inputEmail">Email:<sup>*</sup></label>
                <input type="text" name="email" id="inputEmail" value="<?php echo $email; ?>">
                <span class="error"><?php echo $emailErr; ?></span>
            </p>
            <p>
                <label for="inputSubject">Subject:</label>
                <input type="text" name="subject" id="inputSubject" value="<?php echo $subject; ?>">
            </p>
            <p>
                <label for="inputComment">Message:<sup>*</sup></label>
                <textarea name="message" id="inputComment" rows="5" cols="30"><?php echo $message; ?></textarea>
                <span class="error"><?php echo $messageErr; ?></span>
            </p>
            <input type="submit" value="Send">
            <input type="reset" value="Reset">
        </form>
    </body>
    </html>

    Explanation of code

    You might think what that code was all about. OK, let’s get straight into it.

    • The filterName() function (line no-03) validate input value as person’s name. A valid name can only contain alphabetical characters (a-z, A-Z).
    • The filterEmail() function (line no-14) validate input value as email address.
    • The filterString() function (line no-25) only sanitize the input value by stripping HTML tags and special characters. It doesn’t validate the input value against anything.
    • The attribute action="contact.php" (line no-111) inside the <form> tag specifies that the same contact.php file display the form as well as process the form data.
    • The PHP code inside the value attribute of <input> and <textarea> e.g. <?php echo $name; ?> display prefilled value when form is redisplayed upon validation error.
    • The PHP code inside the .error class e.g. <span class="error"><?php echo $nameErr; ?></span> display error for corresponding field.

    Rest the thing we have already covered in previous chapters. To learn more about sanitize and validate filters, please check out the PHP Filter reference.

  • PHP Form Handling

    Creating a Simple Contact Form

    In this tutorial we are going to create a simple HMTL contact form that allows users to enter their comment and feedback then displays it to the browser using PHP.

    Open up your favorite code editor and create a new PHP file. Now type the following code and save this file as “contact-form.php” in the root directory of your project.

    Example

    <!DOCTYPE html>
    <html lang="en">
    <head>
        <meta charset="UTF-8">
        <title>Contact Form</title>
    </head>
    <body>
        <h2>Contact Us</h2>
        <p>Please fill in this form and send us.</p>
        <form action="process-form.php" method="post">
            <p>
                <label for="inputName">Name:<sup>*</sup></label>
                <input type="text" name="name" id="inputName">
            </p>
            <p>
                <label for="inputEmail">Email:<sup>*</sup></label>
                <input type="text" name="email" id="inputEmail">
            </p>
            <p>
                <label for="inputSubject">Subject:</label>
                <input type="text" name="subject" id="inputSubject">
            </p>
            <p>
                <label for="inputComment">Message:<sup>*</sup></label>
                <textarea name="message" id="inputComment" rows="5" cols="30"></textarea>
            </p>
            <input type="submit" value="Submit">
            <input type="reset" value="Reset">
        </form>
    </body>
    </html>

    Explanation of code

    Notice that there are two attributes within the opening <form> tag:

    • The action attribute references a PHP file “process-form.php” that receives the data entered into the form when user submit it by pressing the submit button.
    • The method attribute tells the browser to send the form data through POST method.

    Rest of the elements inside the form are basic form controls to receive user inputs. To learn more about HTML form elements please check out the HTML Forms tutorial.


    Capturing Form Data with PHP

    To access the value of a particular form field, you can use the following superglobal variables. These variables are available in all scopes throughout a script.

    SuperglobalDescription
    $_GETContains a list of all the field names and values sent by a form using the get method (i.e. via the URL parameters).
    $_POSTContains a list of all the field names and values sent by a form using the post method (data will not visible in the URL).
    $_REQUESTContains the values of both the $_GET and $_POST variables as well as the values of the $_COOKIE superglobal variable.

    When a user submit the above contact form through clicking the submit button, the form data is sent to the “process-form.php” file on the server for processing. It simply captures the information submitted by the user and displays it to browser.

    The PHP code of “process-form.php” file will look something like this:

    Example

    <!DOCTYPE html>
    <html lang="en">
    <head>
        <meta charset="UTF-8">
        <title>Contact Form</title>
    </head>
    <body>
        <h1>Thank You</h1>
        <p>Here is the information you have submitted:</p>
        <ol>
            <li><em>Name:</em> <?php echo $_POST["name"]?></li>
            <li><em>Email:</em> <?php echo $_POST["email"]?></li>
            <li><em>Subject:</em> <?php echo $_POST["subject"]?></li>
            <li><em>Message:</em> <?php echo $_POST["message"]?></li>
        </ol>
    </body>
    </html>

    The PHP code above is quite simple. Since the form data is sent through the post method, you can retrieve the value of a particular form field by passing its name to the $_POST superglobal array, and displays each field value using echo() statement.

    In real world you cannot trust the user inputs; you must implement some sort of validation to filter the user inputs before using them. In the next chapter you will learn how sanitize and validate this contact form data and send it through the email using PHP.

  • PHP Send Emails

    The PHP mail() Function

    Sending email messages are very common for a web application, for example, sending welcome email when a user create an account on your website, sending newsletters to your registered users, or getting user feedback or comment through website’s contact form, and so on.

    You can use the PHP built-in mail() function for creating and sending email messages to one or more recipients dynamically from your PHP application either in a plain-text form or formatted HTML. The basic syntax of this function can be given with:

    mail(tosubjectmessageheadersparameters)

    The following table summarizes the parameters of this function.

    ParameterDescription
    Required — The following parameters are required
    toThe recipient’s email address.
    subjectSubject of the email to be sent. This parameter i.e. the subject line cannot contain any newline character (\n).
    messageDefines the message to be sent. Each line should be separated with a line feed-LF (\n). Lines should not exceed 70 characters.
    Optional — The following parameters are optional
    headersThis is typically used to add extra headers such as “From”, “Cc”, “Bcc”. The additional headers should be separated with a carriage return plus a line feed-CRLF (\r\n).
    parametersUsed to pass additional parameters.

    Sending Plain Text Emails

    The simplest way to send an email with PHP is to send a text email. In the example below we first declare the variables — recipient’s email address, subject line and message body — then we pass these variables to the mail() function to send the email.

    Example

    <?php
    $to = '[email protected]';
    $subject = 'Marriage Proposal';
    $message = 'Hi Jane, will you marry me?'; 
    $from = '[email protected]';
     
    // Sending email
    if(mail($to, $subject, $message)){
        echo 'Your mail has been sent successfully.';
    } else{
        echo 'Unable to send email. Please try again.';
    }
    ?>

    Sending HTML Formatted Emails

    When you send a text message using PHP, all the content will be treated as simple text. We’re going to improve that output, and make the email into a HTML-formatted email.

    To send an HTML email, the process will be the same. However, this time we need to provide additional headers as well as an HTML formatted message.

    Example

    <?php
    $to = '[email protected]';
    $subject = 'Marriage Proposal';
    $from = '[email protected]';
     
    // To send HTML mail, the Content-type header must be set
    $headers  = 'MIME-Version: 1.0' . "\r\n";
    $headers .= 'Content-type: text/html; charset=iso-8859-1' . "\r\n";
     
    // Create email headers
    $headers .= 'From: '.$from."\r\n".
        'Reply-To: '.$from."\r\n" .
        'X-Mailer: PHP/' . phpversion();
     
    // Compose a simple HTML email message
    $message = '<html><body>';
    $message .= '<h1 style="color:#f40;">Hi Jane!</h1>';
    $message .= '<p style="color:#080;font-size:18px;">Will you marry me?</p>';
    $message .= '</body></html>';
     
    // Sending email
    if(mail($to, $subject, $message, $headers)){
        echo 'Your mail has been sent successfully.';
    } else{
        echo 'Unable to send email. Please try again.';
    }
    ?>

    Note: However, the PHP mail() function is a part of the PHP core but you need to set up a mail server on your machine to make it really work.

    In the next two chapters (PHP Form Handling and PHP Form Validation) you will learn how to implement an interactive contact form on your website to receive the user’s comment and feedback through emails using this PHP send mail feature.

  • PHP Sessions

    What is a Session

    Although you can store data using cookies but it has some security issues. Since cookies are stored on user’s computer it is possible for an attacker to easily modify a cookie content to insert potentially harmful data in your application that might break your application.

    Also every time the browser requests a URL to the server, all the cookie data for a website is automatically sent to the server within the request. It means if you have stored 5 cookies on user’s system, each having 4KB in size, the browser needs to upload 20KB of data each time the user views a page, which can affect your site’s performance.

    You can solve both of these issues by using the PHP session. A PHP session stores data on the server rather than user’s computer. In a session based environment, every user is identified through a unique number called session identifier or SID. This unique session ID is used to link each user with their own information on the server like emails, posts, etc.

    Tip: The session IDs are randomly generated by the PHP engine which is almost impossible to guess. Furthermore, because the session data is stored on the server, it doesn’t have to be sent with every browser request.

    Starting a PHP Session

    Before you can store any information in session variables, you must first start up the session. To begin a new session, simply call the PHP session_start() function. It will create a new session and generate a unique session ID for the user.

    The PHP code in the example below simply starts a new session.

    Example

    <?php
    // Starting session
    session_start();
    ?>

    The session_start() function first checks to see if a session already exists by looking for the presence of a session ID. If it finds one, i.e. if the session is already started, it sets up the session variables and if doesn’t, it starts a new session by creating a new session ID.

    Note: You must call the session_start() function at the beginning of the page i.e. before any output generated by your script in the browser, much like you do while setting the cookies with setcookie() function.


    Storing and Accessing Session Data

    You can store all your session data as key-value pairs in the $_SESSION[] superglobal array. The stored data can be accessed during lifetime of a session. Consider the following script, which creates a new session and registers two session variables.

    Example

    <?php
    // Starting session
    session_start();
     
    // Storing session data
    $_SESSION["firstname"] = "Peter";
    $_SESSION["lastname"] = "Parker";
    ?>

    To access the session data we set on our previous example from any other page on the same web domain — simply recreate the session by calling session_start() and then pass the corresponding key to the $_SESSION associative array.

    Example

    <?php
    // Starting session
    session_start();
     
    // Accessing session data
    echo 'Hi, ' . $_SESSION["firstname"] . ' ' . $_SESSION["lastname"];
    ?>

    The PHP code in the example above produce the following output.

    Hi, Peter Parker

    Note: To access the session data in the same page there is no need to recreate the session since it has been already started on the top of the page.


    Destroying a Session

    If you want to remove certain session data, simply unset the corresponding key of the $_SESSION associative array, as shown in the following example:

    Example

    <?php
    // Starting session
    session_start();
     
    // Removing session data
    if(isset($_SESSION["lastname"])){
        unset($_SESSION["lastname"]);
    }
    ?>

    However, to destroy a session completely, simply call the session_destroy() function. This function does not need any argument and a single call destroys all the session data.

    Example

    <?php
    // Starting session
    session_start();
     
    // Destroying session
    session_destroy();
    ?>

    Note: Before destroying a session with the session_destroy() function, you need to first recreate the session environment if it is not already there using the session_start() function, so that there is something to destroy.

    Every PHP session has a timeout value — a duration, measured in seconds — which determines how long a session should remain alive in the absence of any user activity. You can adjust this timeout duration by changing the value of session.gc_maxlifetime variable in the PHP configuration file (php.ini).

  • PHP Cookies

    What is a Cookie

    A cookie is a small text file that lets you store a small amount of data (nearly 4KB) on the user’s computer. They are typically used to keeping track of information such as username that the site can retrieve to personalize the page when user visit the website next time.

    Tip: Each time the browser requests a page to the server, all the data in the cookie is automatically sent to the server within the request.

    Setting a Cookie in PHP

    The setcookie() function is used to set a cookie in PHP. Make sure you call the setcookie() function before any output generated by your script otherwise cookie will not set. The basic syntax of this function can be given with:

    setcookie(namevalueexpirepathdomainsecure);

    The parameters of the setcookie() function have the following meanings:

    ParameterDescription
    nameThe name of the cookie.
    valueThe value of the cookie. Do not store sensitive information since this value is stored on the user’s computer.
    expiresThe expiry date in UNIX timestamp format. After this time cookie will become inaccessible. The default value is 0.
    pathSpecify the path on the server for which the cookie will be available. If set to /, the cookie will be available within the entire domain.
    domainSpecify the domain for which the cookie is available to e.g www.example.com.
    secureThis field, if present, indicates that the cookie should be sent only if a secure HTTPS connection exists.

    Tip: If the expiration time of the cookie is set to 0, or omitted, the cookie will expire at the end of the session i.e. when the browser closes.

    Here’s an example that uses setcookie() function to create a cookie named username and assign the value value John Carter to it. It also specify that the cookie will expire after 30 days (30 days * 24 hours * 60 min * 60 sec).

    Example

    <?php
    // Setting a cookie
    setcookie("username", "John Carter", time()+30*24*60*60);
    ?>

    Note: All the arguments except the name are optional. You may also replace an argument with an empty string (“”) in order to skip that argument, however to skip the expire argument use a zero (0) instead, since it is an integer.

    Warning: Don’t store sensitive data in cookies since it could potentially be manipulated by the malicious user. To store the sensitive data securely use sessions instead.


    Accessing Cookies Values

    The PHP $_COOKIE superglobal variable is used to retrieve a cookie value. It typically an associative array that contains a list of all the cookies values sent by the browser in the current request, keyed by cookie name. The individual cookie value can be accessed using standard array notation, for example to display the username cookie set in the previous example, you could use the following code.

    Example

    <?php
    // Accessing an individual cookie value
    echo $_COOKIE["username"];
    ?>

    The PHP code in the above example produce the following output.

    John Carter

    It’s a good practice to check whether a cookie is set or not before accessing its value. To do this you can use the PHP isset() function, like this:

    Example

    <?php
    // Verifying whether a cookie is set or not
    if(isset($_COOKIE["username"])){
        echo "Hi " . $_COOKIE["username"];
    } else{
        echo "Welcome Guest!";
    }
    ?>

    You can use the print_r() function like print_r($_COOKIE); to see the structure of this $_COOKIE associative array, like you with other arrays.


    Removing Cookies

    You can delete a cookie by calling the same setcookie() function with the cookie name and any value (such as an empty string) however this time you need the set the expiration date in the past, as shown in the example below:

    Example

    <?php
    // Deleting a cookie
    setcookie("username", "", time()-3600);
    ?>
  • PHP File Download

    Downloading Files with PHP

    Normally, you don’t necessarily need to use any server side scripting language like PHP to download images, zip files, pdf documents, exe files, etc. If such kind of file is stored in a public accessible folder, you can just create a hyperlink pointing to that file, and whenever a user click on the link, browser will automatically downloads that file.

    Example

    <a href="downloads/test.zip">Download Zip file</a>
    <a href="downloads/masters.pdf">Download PDF file</a>
    <a href="downloads/sample.jpg">Download Image file</a>
    <a href="downloads/setup.exe">Download EXE file</a>

    Clicking a link that points to a PDF or an Image file will not cause it to download to your hard drive directly. It will only open the file in your browser. Further you can save it to your hard drive. However, zip and exe files are downloaded automatically to the hard drive by default.


    Forcing a Download Using PHP

    You can force images or other kind of files to download directly to the user’s hard drive using the PHP readfile() function. Here we’re going to create a simple image gallery that allows users to download the image files from the browser with a single mouse click.

    Let’s create a file named “image-gallery.php” and place the following code inside it.

    Example

    <!DOCTYPE html>
    <html lang="en">
    <head>
    <meta charset="UTF-8">
    <title>Simple Image Gallery</title>
    <style type="text/css">
        .img-box{
            display: inline-block;
            text-align: center;
            margin: 0 15px;
        }
    </style>
    </head>
    <body>
        <?php
        // Array containing sample image file names
        $images = array("kites.jpg", "balloons.jpg");
        
        // Loop through array to create image gallery
        foreach($images as $image){
            echo '<div class="img-box">';
                echo '<img src="images/' . $image . '" width="200" alt="' .  pathinfo($image, PATHINFO_FILENAME) .'">';
                echo '<p><a href="download.php?file=' . urlencode($image) . '">Download</a></p>';
            echo '</div>';
        }
        ?>
    </body>
    </html>

    If you see the above example code carefully, you’ll find the download link pints to a “download.php” file, the URL also contains image file name as a query string. Also, we’ve used PHP urlencode() function to encode the image file names so that it can be safely passed as URL parameter, because file names may contain URL unsafe characters.

    Here’s the complete code of “download.php” file, which force image download.

    Example

    <?php
    if(isset($_REQUEST["file"])){
        // Get parameters
        $file = urldecode($_REQUEST["file"]); // Decode URL-encoded string
    
        /* Test whether the file name contains illegal characters
        such as "../" using the regular expression */
        if(preg_match('/^[^.][-a-z0-9_.]+[a-z]$/i', $file)){
            $filepath = "images/" . $file;
    
            // Process download
            if(file_exists($filepath)) {
                header('Content-Description: File Transfer');
                header('Content-Type: application/octet-stream');
                header('Content-Disposition: attachment; filename="'.basename($filepath).'"');
                header('Expires: 0');
                header('Cache-Control: must-revalidate');
                header('Pragma: public');
                header('Content-Length: ' . filesize($filepath));
                flush(); // Flush system output buffer
                readfile($filepath);
                die();
            } else {
                http_response_code(404);
    	        die();
            }
        } else {
            die("Invalid file name!");
        }
    }
    ?>

    Similarly, you can force download other files formats like word doc, pdf files, etc.

    The regular expression in the above example (line no-8) will simply not allow those files whose name starts or ends with a dot character (.), for example, it allows the file names such as kites.jpg or Kites.jpgmyscript.min.js but do not allow kites.jpg. or .kites.jpg.

  • PHP File Upload

    Uploading Files with PHP

    In this tutorial we will learn how to upload files on remote server using a Simple HTML form and PHP. You can upload any kind of file like images, videos, ZIP files, Microsoft Office documents, PDFs, as well as executables files and a wide range of other file types.

    Step 1: Creating an HTML form to upload the file

    The following example will create a simple HTML form that can be used to upload files.

    Example

    <!DOCTYPE html>
    <html lang="en">
    <head>
        <meta charset="UTF-8">
        <title>File Upload Form</title>
    </head>
    <body>
        <form action="upload-manager.php" method="post" enctype="multipart/form-data">
            <h2>Upload File</h2>
            <label for="fileSelect">Filename:</label>
            <input type="file" name="photo" id="fileSelect">
            <input type="submit" name="submit" value="Upload">
            <p><strong>Note:</strong> Only .jpg, .jpeg, .gif, .png formats allowed to a max size of 5 MB.</p>
        </form>
    </body>
    </html>

    Note: In addition to a file-select field the upload form must use the HTTP post method and must contain an enctype="multipart/form-data" attribute. This attribute ensures that the form data is encoded as mulitpart MIME data — which is required for uploading the large quantities of binary data such as image, audio, video, etc.

    Step 2: Processing the uploaded file

    Here’s the complete code of our “upload-manager.php” file. It will store the uploaded file in a “upload” folder on permanent basis as well as implement some basic security check like file type and file size to ensure that users upload the correct file type and within the allowed limit.

    Example

    <?php
    // Check if the form was submitted
    if($_SERVER["REQUEST_METHOD"] == "POST"){
        // Check if file was uploaded without errors
        if(isset($_FILES["photo"]) && $_FILES["photo"]["error"] == 0){
            $allowed = array("jpg" => "image/jpg", "jpeg" => "image/jpeg", "gif" => "image/gif", "png" => "image/png");
            $filename = $_FILES["photo"]["name"];
            $filetype = $_FILES["photo"]["type"];
            $filesize = $_FILES["photo"]["size"];
        
            // Verify file extension
            $ext = pathinfo($filename, PATHINFO_EXTENSION);
            if(!array_key_exists($ext, $allowed)) die("Error: Please select a valid file format.");
        
            // Verify file size - 5MB maximum
            $maxsize = 5 * 1024 * 1024;
            if($filesize > $maxsize) die("Error: File size is larger than the allowed limit.");
        
            // Verify MYME type of the file
            if(in_array($filetype, $allowed)){
                // Check whether file exists before uploading it
                if(file_exists("upload/" . $filename)){
                    echo $filename . " is already exists.";
                } else{
                    move_uploaded_file($_FILES["photo"]["tmp_name"], "upload/" . $filename);
                    echo "Your file was uploaded successfully.";
                } 
            } else{
                echo "Error: There was a problem uploading your file. Please try again."; 
            }
        } else{
            echo "Error: " . $_FILES["photo"]["error"];
        }
    }
    ?>

    Note: The above script prevents uploading a file with the same name as an existing file in the same folder. However, if you want to allow this just prepend the file name with a random string or timestamp, like $filename = time() . '_' . $_FILES["photo"]["name"];

    You might be wondering what this code was all about. Well, let’s go through each part of this example code one by one for a better understanding of this process.

    Explanation of Code

    Once the form is submitted information about the uploaded file can be accessed via PHP superglobal array called $_FILES. For example, our upload form contains a file select field called photo (i.e. name="photo"), if any user uploaded a file using this field, we can obtains its details like the name, type, size, temporary name or any error occurred while attempting the upload via the $_FILES["photo"] associative array, like this:

    • $_FILES["photo"]["name"] — This array value specifies the original name of the file, including the file extension. It doesn’t include the file path.
    • $_FILES["photo"]["type"] — This array value specifies the MIME type of the file.
    • $_FILES["photo"]["size"] — This array value specifies the file size, in bytes.
    • $_FILES["photo"]["tmp_name"] — This array value specifies the temporary name including full path that is assigned to the file once it has been uploaded to the server.
    • $_FILES["photo"]["error"] — This array value specifies error or status code associated with the file upload, e.g. it will be 0, if there is no error.

    The PHP code in the following example will simply display the details of the uploaded file and stores it in a temporary directory on the web server.

    Example

    <?php
    if($_FILES["photo"]["error"] > 0){
        echo "Error: " . $_FILES["photo"]["error"] . "<br>";
    } else{
        echo "File Name: " . $_FILES["photo"]["name"] . "<br>";
        echo "File Type: " . $_FILES["photo"]["type"] . "<br>";
        echo "File Size: " . ($_FILES["photo"]["size"] / 1024) . " KB<br>";
        echo "Stored in: " . $_FILES["photo"]["tmp_name"];
    }
    ?>

    Tip: Once a file has been successfully uploaded, it is automatically stored in a temporary directory on the server. To store this file on a permanent basis, you need to move it from the temporary directory to a permanent location using the PHP’s move_uploaded_file() function.