<script type="text/javascript">

var  Person = Backbone.Model.extend();

var person = new Person();

person.set({ fname: "Sheela", lname:"Sharma"});

document.write("What's my name: ", person.get('fname'));

</script>
First Backbone.js Example
<!DOCTYPE html>

   <head>

      <title>Model Example</title>

         <script src="https://code.jquery.com/jquery-2.1.3.min.js" type="text/javascript"></script>

         <script src="https://cdnjs.cloudflare.com/ajax/libs/underscore.js/1.8.2/underscore-min.js" type="text/javascript"></script>

         <script src="https://cdnjs.cloudflare.com/ajax/libs/backbone.js/1.1.2/backbone-min.js" type="text/javascript"></script>

         <script type="text/javascript">

            var  Person = Backbone.Model.extend();

            var person = new Person();

            person.set({ fname: "Mahesh", lname:"Sharma"});

            document.write("What's my name: ", person.get('fname'));

         </script>

   </head>

</html>
The Backbone.js is a very light weight JavaScript library or framework that facilitates developers to create a single page application in a structured manner. These client side applications run on a web browser. It is based on MVC pattern which abstracts data into models, DOM into views and bind these two using events.
Backbone.js is mainly used for creating single page applications using a RESTful service for persisting data.
History
Backbone.js was initially released on October 13, 2010. It was developed by Jeremy Ashkenas.
When to use Backbone.js
Backbone.js is used to reduce complications. For example: Suppose, you are creating an application having lots of line of codes using jQuery or JavaScript. The application generally becomes complicated when you add or replace DOM elements to the application or make some requests or show animation in the application or add extra lines to your code, the application may become complicated. So, Backbone.js provides an easy way to overcome with these complications.
If your application is having lots of codes and you want a better design then Backbone.js library can be used for good functionality. It provides a well organized and structured way to develop your application.
Backbone communicates via events, so you will get a fast application and your code will be cleaner, nicer and more maintainable.
Backbone.js tutorial provides basic and advanced concepts of Backbone.js. Our Backbone.js tutorial is designed for beginners and professionals both.
Backbone.js is a framework or JavaScript library for creating single page web application.
Our BackboneJS tutorial includes all topics of Backbone.js such as features, architecture, first example, events, model, collection, router, history, sync, view, utility etc. There are also given Backbone.js interview questions to help you better understand the Backbone.js technology.
Interpolation is used for one-way data binding in Angular. It embeds an expression into the HTML template. By default, expression should be surrounded by {{ and }}. This expression is also known as template expression.
{{ expression }}
Angular evaluates an expression surrounded by {{ and }} and then converts a result to a string and assigns it to an element or directive property.
{{ expression }} output=> string
The following example evaluates an arithmetic expression, converts the result into a string.
The context of the interpolation expression is a component class. It means it can access public properties or methods of a component class. However, it cannot access private or protected members.
Consider the following component class.
Example: Angular Component Copy
export class InterpolationDemo implements OnInit {

  public text: string = "Hello";
  public caption: string = "Click Me!";
  num: number = 0;
  randomNums: number[] = [3, 6, 7, 8, 1, 122, 44, 67, 790];

  private count:number = 0;

  ngOnInit(): void {
  }

  getCurrentTime(): any {
    return Date.now();
  }
}
The HTML template of the above component can use members as an expression in interpolation, as shown below.
Example: Interpolation Copy
<p>{{ text }} </p>
<p>{{ num }} </p>
<p>{{ getCurrentTime() }} </p>
<button innerText={{caption}}></button>
It can also use template input variable, as shown below.
Example: Input Variable Copy
<ul>
  <li *ngFor="let rndNum of randomNums">{{rndNum}}</li>
</ul>
Most JavaScript expressions are valid template expression except the following: – Assignment, bitwise, increment and decrement perators (=,+=, -=, |, &, ++, –,!, ?. etc.) – new, typeof, instanceof, etc. – chaining expression with ; or , – some ES2015+ operators
The following will give a compile-time error.
Example: Invalid Interpolation Copy
<p>{{ num++ }} </p>
<p>{{ num += 1}} </p>
<p>{{ count}} </p>
<p>{{ typeof(num) }} </p>
<p>{{ Date.now()}} </p>
<p>{{ window.name}} </p>
<p>{{ console.log('This is an error')}} </p>
Configure Interpolation Delimiter
Note:
By default, Angular use {{ and }} delimiter. However, you can configure it and specify different delimiter using the interpolation option in the @Component decorator.
For example, the following configures ? and ? as starting and ending interpolation delimiter.
Here you will learn how to do two-way data binding in Angular.
Two-way data binding refers to sharing data between a component class and its template. If you change data in one place, it will automatically reflate at the other end. For example, if you change the value of the input box, then it will also update the value of the attached property in a component class.
Two-way data binding performs the following actions:
Sets a property of a component class
Listens for a DOM element change event
Angular v2+ supports two-way data binding using ngModel directive and also by having getter and setter methods.
ngModel Directive
The ngModel directive with [()] syntax (also known as banana box syntax) syncs values from the UI to a property and vice-versa. So, whenever the user changes the value on UI, the corresponding property value will get automatically updated.
[()] = [] + () where [] binds attribute, and () binds an event.
The [(ngModel)] syntax is the recommended way of two-way data binding.
The ngModel directive with [] syntax is used for one-way data binding. [ngModel] binds a value to a property to UI control.
Getter and Setter Methods
For two-way data binding, declare a private property and access its value using get and set methods in the component class. Then, assign that property to [(ngModel)].
For example, declare a private property with a get and set method, as shown below.
Example: Private Property Copy
private _userName: string = "bill gates";

  get userName(): string {
    return this._userName;
  }

  set userName(val: string) {
    //do some extra work here
    this._userName = val;
  }
Now, assign userName to [(ngModel)] in the template.
Example: [(ngModel)] Copy
<input type="text" [(ngModel)]="userName" >
The following is a full example of two-way data binding using get and set methods.
Example: Two-way Data Binding Copy
import { Component, OnInit } from '@angular/core';

@Component({
  selector: 'app-greet',
  template: `
  User Name: <input type="text" [(ngModel)]="userName" ><br/>
    {{userName}}`
})
export class GreetComponent implements OnInit {

  constructor() { }

  private _userName: string = "bill gates";

  get userName(): string {
    return this._userName;
  }
  set userName(val: string) {
    //do some extra work here
    this._userName = val;
  }
  ngOnInit(): void {
  }
}
Alternatively, use the on- prefix, known as the canonical form:
Example: on-event
<button on-click="onShow()" >Show</button>
By default, an event propagates up to the parent container event. In the following example, click event propagates to click of div and will call both the onShow() and onDivClick() methods.
Mostly, when an event is raised, you may need to pass some value to the event handler function. This value can be number, string, or an object that contains information about an event.
You can pass the number or string value to the event handler function, as shown below.
Example: Passing Event Data
<button (click)="onShow(20)">Show</button>
Angular includes $event that contains the information about an event. The type of $event depends on the target event, e.g., if the target event is a native DOM element event, then it is an object.
Example: $event
<button (click)="onShow($event)">Show</button>
A component should define the onShow(event) method where the type of the parameter can be KeyboardEvent, MouseEvent, etc. If you don’t know the exact event type, they use “any” type, as shown below.
Example: event Parameter
onShow(event:any) {
    console.log(event);
  }
If event is a native DOM element event then $event.target get DOM element reference using which you can access element’s property e.g. $event.target.innerHTML returns the value of innerHTML property of a DOM element.
You can use $event.target in the template statement. The following example binds a component property to $event.target.value of the input box on the input event without using ngModel.
It can also be a multi-line template wrapped inside backticks char `.
Example: Multi-line Template Copy
@Component({
    selector: "app-greet",
    template: `<div>
    Enter Your Name: <input type="text" value={{name}} /> <br/>
    <button (click)="greet()">Greet Me!</button>
    </div>`
})
Linked Template
A component can have a separate HTML file to include an HTML template of a component. Use the templateUrl parameter to declare the path of the HTML template file, as shown below.
Here, you will learn about the Angular component and how to create a custom component using Angular CLI.
Angular is a SPA framework, and a view is made of one or more component. An Angular component represents a portion of a view.
Generally, an interactive web page is made of HTML, CSS, and JavaScript. Angular component is no different.
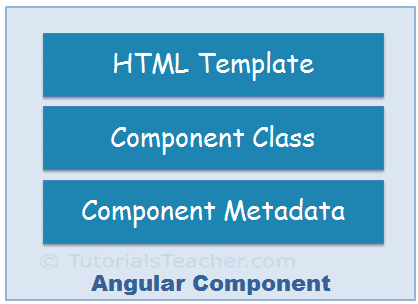
Angular Component = HTML Template + Component Class + Component Metadata
HTML Template
HTML template is nothing but a regular HTML code with additional Angular specific syntax to communicate with the component class.
Class
Essentially, a component class is a TypeScript class that includes properties and methods. Properties store data and methods include the logic for the component. Eventually, this class will be compiled into JavaScript.
Note:
TypeScript is an open-source, object-oriented language developed and maintained by Microsoft. It is a typed superset of JavaScript that compiles to plain JavaScript.
Metadata
Metadata is some extra data for a component used by Angular API to execute the component, such as the location of HTML and CSS files of the component, selector, providers, etc.
Generate Angular Component using Angular CLI
You can create files for a component manually or using the Angular CLI command. Angular CLI reduces the development time. So, let’s use Angular CLI to create a new component.
Use the following CLI command to generate a component.
ng generate component <component name>
All Angular CLI command starts with ng, generate or g is a command, component is an argument and then the name of the component.
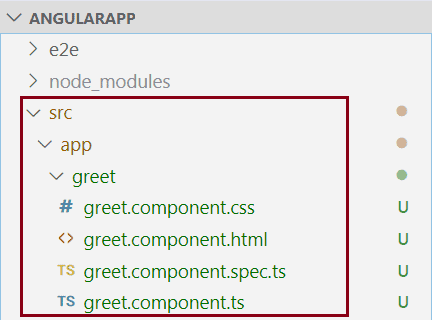
The following executes the ng g command to generate the greet component in VS Code.
Create Angular Component
The above command will create a new “greet” folder and app folder and create four files, as shown below.
Component Files
Above, greet.component.css is a CSS file for the component, greet.component.html is an HTML file for the component where we will write HTML for a component, greet.component.spec.ts is a test file where we can write unit tests for a component, and greet.component.ts is the class file for a component.
Note:
A component can have a single file or multiple files. A single TypeScript file can include an HTML template, component class, and component metadata.
Component Naming Convention
All the component files in Angular should follow the following format:
<component-name>.component.<file-type>
A component file should include .component in name prefixed with the component name and followed by file type. For example, a TypeScript file for our greet component is named greet.component.ts. As you have noticed, all the files of greet component are having the same naming conventions. Visit Angular Style guide to know more about it.
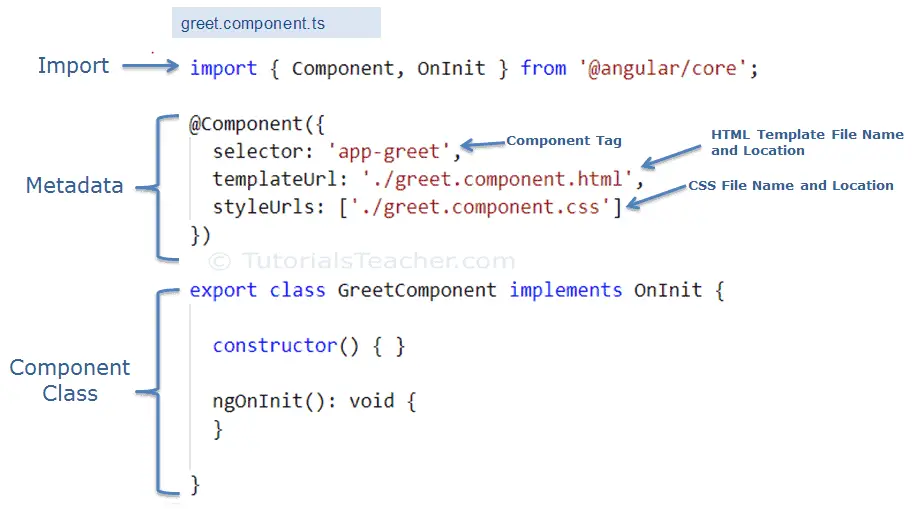
Now, open greet.component.ts file in VS Code, and you will see the following code.
The following figure illustrates the important part of the component class.
The greet.component.ts includes the following parts:
Component Class:GreetComponent is the component class. It contains properties and methods to interact with the view through an Angular API. It implements the OnInit interface, which is a lifecycle hook.
Component Metadata: The @Component is a decorator used to specify the metadata for the component class defined immediately below it. It is a function and can include different configs for the component. It instructs Angular where to get required files for the component, create and render component. All Angular components must have @Component decorator above the component class.
The import statement gets the required feature from the Angular or other libraries. Import allows us to use exported members from external modules. For example, @Component decorator and OnInit interface are contained in @angular/core library. So, we can use them after importing it.
Now, let’s add a property and method in the component class, as shown below.
Example: Add Properties and Methods in the Component Class
Above, we have added the name property and the greet method in the component class. Let’s use these in the HTML template.
Open greet.component.html file, remove existing code and add the following code.
greet.component.ts
<div> Enter Your Name: <inputtype="text"value={{name}}/><br/><button(click)="greet()">Greet Me!</button></div>
In the above HTML template, we used name property in the {{ }} interpolation to display its value and greet() function as click event. Lean more about it in event binding section.
Bootstrapping Component
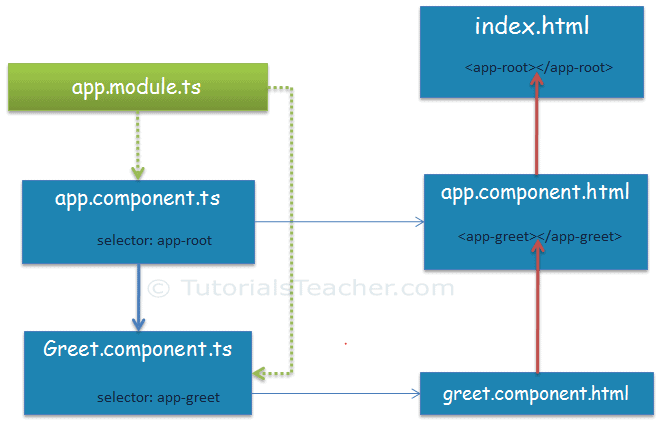
Now, it’s time to load our component, but before that, we need to host our application and load the root component. This process is called bootstrapping.
Angular is a single page application (SPA) framework. So, we need to host our application in index.html, and then we need to define a root module to bootstrap our root component. Index.html will be the only web page in an Angular application, and that’s why it is called SPA.
When you generate Angular application using Angular CLI, it automatically creates index.html, root component app.component.ts, root module app.module.ts, and HTML template app.component.html for you. The AppComponent class in app.component.ts is a root component, and the AppModule class in app.module.ts is a root module.
Here, we will load our greet component into the root component in two steps.
1. Declare a component in the root module.
We want to load our new GreetComponent into the root component. So, the root module must know about it. We can do it by adding the GreetComponent in the declarations array in app.module.ts, as shown below.
Example: Add Component in the root module app.module.ts
After adding a component declaration, use component tag <app-greet></app-greet> in the HTML file of the root component, which is app.component.html, as shown below.
app.component.html
<div><app-greet></app-greet></div>
The following figure illustrates the component bootstrap process:
Run the app by executing npm start command in the terminal of VS Code. After successful compilation, open the browser and enter http://localhost:4200. The following page will be displayed.
This is how we can create and use custom components in Angular.
We can also create a single component file greet.component.ts if the HTML code of a component is less. Use the template parameter in the @Component decorator to include HTML of the component. The following greet component gives the same result as above.
Example: Component Class with HTML Template
import{ Component }from'@angular/core'; @Component({ selector:"app-greet", template:`<div> Enter Your Name: <input type="text" value={{name}} /> <br/> <button (click)="greet()">Greet Me!</button> </div>`})exportclassGreetComponent{ name:string="Steve";greet():void{alert("Hello "+this.name);};}
Here you will learn to create an Angular 2 (valid in the Angular 11 too) application using Angular CLI.
Angular CLI helps us to set up a workspace and an initial application quickly, which includes necessary NPM libraries and other dependencies for the application.
To create an initial application, navigate to the folder where you want to create an application, and execute the ng new <project name> command in the terminal/command window.
The following creates a new angular application named “FirstAngularApp” in the AngularApps folder.D:\AngularApps> ng new FirstAngularApp
The ng new command prompts you for information about features to include in the initial app project. You can accept the defaults by pressing an Enter key, as shown below.
Generate Angular App using Angular CLI
The above command may take 2-3 minutes to create a project and install necessary libraries. To open this project in VS Code, navigate to the project folder in the terminal/command window and type code ..D:\AngularApps\FirstAngularApp\>code .
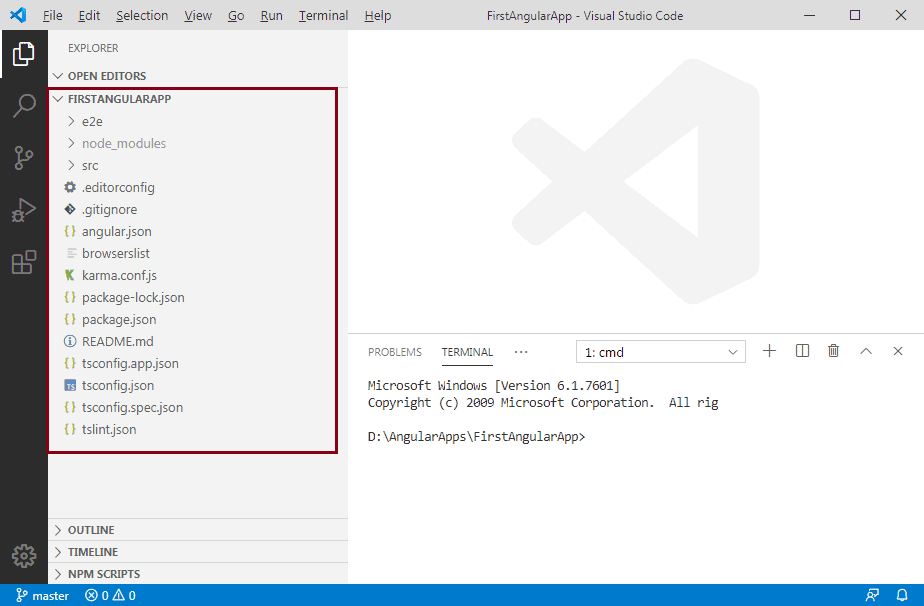
Your new project in VS Code will look like below.
Angular Project in VS Code
The left pane in VS Code shows the files and folders created by Angular CLI. Learn about the Angular project folder structure here.
Run Angular Application
To run an Angular application in the browser, you first need to build it.
You can build and run applications either using Angular CLI command or NPM command. You can use the terminal/command window to execute these commands. However, if you are using VS Code then you can execute commands from its terminal.
Use Angular CLI command ng serve -o to build an application. The -o indicates to open it automatically in the default browser.
Use NPM command npm start to build an application. Internally, it uses ng serve command only. Open a browser and navigate to http://localhost:4200 to see the application home page. The http://localhost:4200 is the default URL of an Angular application created using Angular CLI.
Open the terminal in VS Code from menu Terminal -> New Terminal, and type ng serve -o command and press enter, as shown below.
The ng serve command builds the app, starts the development server, watches the source files, and rebuilds the app as you make changes to those files. It will open your Angular application in the default browser, as shown below.
The ng serve command keep watching source files, so if you make any changes in any file of the project, it will rebuild it and refresh the browser automatically to reflect the changes.
To stop the automatic build process, press Ctrl + c in the terminal of VS Code.
Thus, you can create a workspace and an initial Angular project and run it using VS Code.